該程序是基于“4_PWM的實現”中的程序改編的。代碼如下:
- void Change_PWM(int duty1,int duty2,int duty3,int duty4)
- {
- SCB->AIRCR=0x05AF00;// 中斷優先級分組 搶占:響應=3:1
- RCC->AHB1ENR|=(1<<2);// 打開GPIOC時鐘
- GPIOC->MODER|=0x000AA000;// pc6789第二功能,推挽輸出
- GPIOC->OSPEEDR|=0x000FF000;//輸出速度為100m
- GPIOC->PUPDR|=0x00055000;//上拉
-
- GPIOC->AFR[0]|=0x22000000;//pc6789的第二功能為AF2
- GPIOC->AFR[1]|=0x00000022;
-
- RCC->APB1ENR|=(1<<1);//打開TIM3時鐘
- TIM3->PSC=83;//對84M時鐘進行84分頻,使得計數頻率為1M
- TIM3->ARR=10000;//周期為10ms
- TIM3->EGR|=1;//產生一次更新時間
-
- TIM3->CCMR1|=0x6060;//PWM模式1
- TIM3->CCMR2|=0x6060;//PWM模式2
-
- TIM3->CCR1=duty1;//1路PWM
- TIM3->CCR2=duty2;//2路PWM
- TIM3->CCR3=duty3;//3路PWM
- TIM3->CCR4=duty4;//4路PWM
-
- TIM3->CCER|=0x1111;//使能比較輸出
-
- TIM3->CCMR1|=0x0808;//啟動預裝載
- TIM3->CCMR2|=0x8080;
-
- TIM3->CR1|=1;//開始計時
- }
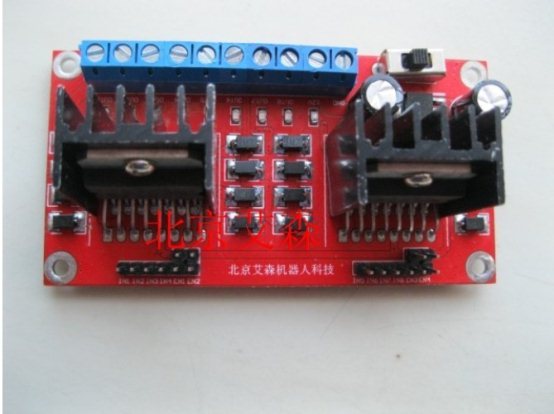
改程序將電機驅動模塊的8個輸入端口接到了主控板的8個GPIO口,通過推挽輸出,從而控制電機的轉向,代碼如下:
- void Direction(int direction)
- {
- SysTick_Config(SystemCoreClock / 1000); //時鐘中斷設為1ms
- RCC->AHB1ENR |= 0x00000005; //使能GPIOA和GPIOD時鐘
- RCC->APB2ENR |= (1<<14); //使能syscfg時鐘
- if(direction==0)
- {
- GPIOA->MODER &= 0xffff0000; //設置PA0,1,2,3為輸出
- GPIOA->MODER |= 0x00005555;
- GPIOA->OTYPER &= 0xFFFFff00; //設置PA0,1,2,3為推挽輸出
- GPIOA->OSPEEDR &= 0xffff0000; //設置PA0,1,2,3的輸出速度為100M
- GPIOA->OSPEEDR |= 0x0000ffff;
- SYSCFG->CMPCR = 0x00000001; //使用IO補償單元
- GPIOA->PUPDR &= 0xffffff00; //設置PA0,1,2,3無上拉,無下拉
- GPIOA->BSRRH = 0x00ff; //復位GPIOA_BSRRH寄存器
- GPIOA->BSRRL = 0x0055;
- }
- else
- {
- GPIOA->MODER &= 0xffff0000; //設置PA0,1,2,3為輸出
- GPIOA->MODER |= 0x0000005555;
- GPIOA->OTYPER &= 0xFFFFff00; //設置PA0,1,2,3為推挽輸出
- GPIOA->OSPEEDR &= 0xffff0000; //設置PA0,1,2,3的輸出速度為100M
- GPIOA->OSPEEDR |= 0x0000ffff;
- SYSCFG->CMPCR = 0x00000001; //使用IO補償單元
- GPIOA->PUPDR &= 0xffffff00; //設置PA0,1,2,3無上拉,無下拉
- GPIOA->BSRRH = 0x00ff; //復位GPIOA_BSRRH寄存器
- GPIOA->BSRRL = 0x00AA;
- }
- }
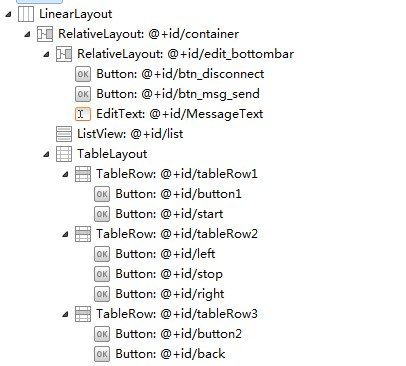
控制界面主要運用了線性布局、相對布局和表格布局。整體采用線性布局,局部采用相對布局,而控制按鈕采用了表格布局。控制界面的布局如圖4.1所示:
圖4.1 控制界面的布局
4.2.2 布局的代碼如下:<?xml version="1.0" encoding="utf-8"?>
<LinearLayout xmlns:android="http://schemas.android.com/apk/res/android"
android:layout_width="wrap_content"
android:layout_height="fill_parent"
android:orientation="vertical" >
<RelativeLayout
android:id = "@+id/container"
android:orientation="vertical"
android:layout_width="fill_parent"
android:layout_height="fill_parent"
>
<RelativeLayout
android:layout_width="fill_parent"
android:layout_height="wrap_content"
android:id= "@+id/edit_bottombar"
android:layout_alignParentBottom = "true">
<Button android:id="@+id/btn_disconnect"
android:layout_width="65dp"
android:layout_height="wrap_content"
android:layout_alignParentLeft ="true"
android:text="斷開"/>
<Button android:id="@+id/btn_msg_send"
android:layout_width="65dp"
android:layout_height="wrap_content"
android:layout_alignParentRight ="true"
android:text="發送"/>
<EditText
android:id="@+id/MessageText"
android:layout_width="98dp"
android:layout_height="wrap_content"
android:layout_toRightOf="@+id/btn_disconnect"
android:hint="說點什么呢?"
android:textSize="15dip"
/>
</RelativeLayout>
<ListView
android:id="@+id/list"
android:layout_width="wrap_content"
android:layout_height="wrap_content"
android:layout_above="@id/edit_bottombar"
android:layout_below="@id/container"
android:layout_weight="1.0"
android:divider="#ffc6c6c6"
android:scrollingCache="false"
android:visibility="visible" />
<TableLayout
android:layout_width="match_parent"
android:layout_height="wrap_content" >
<TableRow
android:id="@+id/tableRow1"
android:layout_width="wrap_content"
android:layout_height="wrap_content" >
<Button
android:id="@+id/button1"
android:layout_width="wrap_content"
android:layout_height="wrap_content"
android:text="Button"
android:visibility="invisible" />
<Button
android:id="@+id/start"
android:layout_width="wrap_content"
android:layout_height="wrap_content"
android:layout_marginRight="0dp"
android:text="start"
android:width="120px" />
</TableRow>
<TableRow
android:id="@+id/tableRow2"
android:layout_width="wrap_content"
android:layout_height="0dp"
android:layout_weight="1" >
<Button
android:id="@+id/left"
android:layout_width="wrap_content"
android:layout_height="wrap_content"
android:layout_marginRight="0dp"
android:text="left"
android:width="120px" />
<Button
android:id="@+id/stop"
android:layout_width="wrap_content"
android:layout_height="wrap_content"
android:text="stop"
android:width="120px" />
<Button
android:id="@+id/right"
android:layout_width="wrap_content"
android:layout_height="wrap_content"
android:text="right"
android:width="120px" />
</TableRow>
<TableRow
android:id="@+id/tableRow3"
android:layout_width="wrap_content"
android:layout_height="wrap_content" >
<Button
android:id="@+id/button2"
android:layout_width="wrap_content"
android:layout_height="wrap_content"
android:text="Button"
android:visibility="invisible" />
<Button
android:id="@+id/back"
android:layout_width="wrap_content"
android:layout_height="wrap_content"
android:text="Back" />
</TableRow>
</TableLayout>
</RelativeLayout>
</LinearLayout>
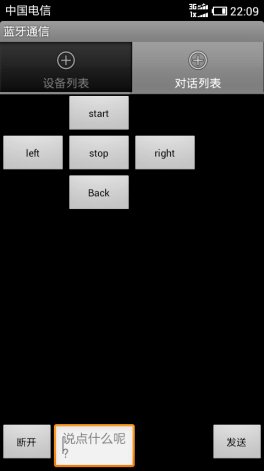
4.2.3 android客戶端的界面如圖4.2所示:圖4.2 android控制界面
4.2.4 發送按鈕的代碼sendButton= (Button)findViewById(R.id.btn_msg_send);
sendButton.setOnClickListener(new OnClickListener() {
@Override
public void onClick(View arg0) {
// TODO Auto-generated method stub
String msgText =editMsgView.getText().toString();//獲取編輯框內的內容
if (msgText.length()>0) {
sendMessageHandle(msgText);//發送編輯框的內容給串口
editMsgView.setText("");//清空編輯框
editMsgView.clearFocus();
//close InputMethodManager
InputMethodManager imm = (InputMethodManager)getSystemService(Context.INPUT_METHOD_SERVICE);
imm.hideSoftInputFromWindow(editMsgView.getWindowToken(), 0);
}
else
Toast.makeText(mContext, "發送內容不能為空!", Toast.LENGTH_SHORT).show();
}
});
4.2.5 控制按鈕的代碼以左轉按鈕為例:
sendButton= (Button)findViewById(R.id.left);
sendButton.setOnClickListener(new OnClickListener() {
@Override
public void onClick(View arg0) {
String msgText ="1"; // 發送左轉命令“l”
if (msgText.length()>0) {
sendMessageHandle(msgText);//發送“l”給串口
editMsgView.setText("");//清空編輯框
editMsgView.clearFocus();
//close InputMethodManager
InputMethodManager imm = (InputMethodManager)getSystemService(Context.INPUT_METHOD_SERVICE);
imm.hideSoftInputFromWindow(editMsgView.getWindowToken(), 0);
}
else
Toast.makeText(mContext, "發送內容不能為空!", Toast.LENGTH_SHORT).show();
}
});
1. 系統創新自從有了智能手機,機器人的應用也就多了一個新的方向:手機控制機器人。2005年日本第二大電信運營商KDDI和機械制造商IBee KK聯合推出了第一款手機控制機器人。當然了,想要操縱這種機器人,你首先需要使用KDDI網絡,并且用戶的手機上,本身還需要帶有藍牙功能,然后再通過KDDI提供BREW方式下載機器人的驅動程式和控制系統。不過這種機器人的價格卻相對高昂,預售市價約合人民幣15000元。隨著Android系統技術的普及,可以做個基于Android的客戶端,在小車上裝個接收藍牙信號的FBT藍牙接收模塊,然后就可以通過客戶端發送藍牙信號,來對藍牙小車進行控制控制,其接收可達15米,完全能適應對小車的要求。其中這個FBT藍牙接收模塊是低耗能,這樣就把更多的能量用在小車的驅動上。
小車需要很大的馬力和很好的靈活性以應對不同的地形。這輛車的車輪使用四驅的直流電機來驅動的,用PWM波來控制小車的速度,可以很方便的更改其速度,有主控板通過推挽輸出來控制電機的翻轉以讓車子進行后退的速度。這樣就可以勝任對小車的要求。
2. 評測與結論首先,給電源模塊上12v的電源,然后打開電機驅動模塊開關,同時將主控板的供電端連接到電源管理模塊。然后,在android手機上安裝“藍牙通信”應用程序后,打開該APP,然后選擇“允許打開藍牙”。點擊設備列表中的“開始搜索按鈕”,在設備列表中選擇藍牙模塊的名字進行連接。
完成上述工作以后,就可以在手機上通過按下“start”、“left”、“stop”、“right”、“back”通過藍牙給小車發送“前進”、“左轉”、“停止”、“右轉”、“后退”5個命令。小車可以解析命令輕松進行前進、后退、左轉、右轉和停止。
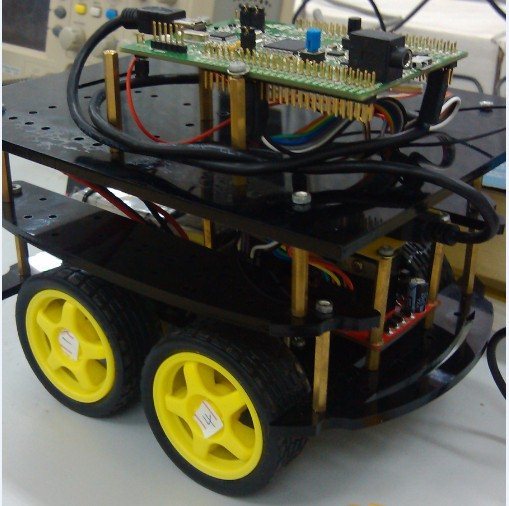
附錄圖6-1 作品成果1
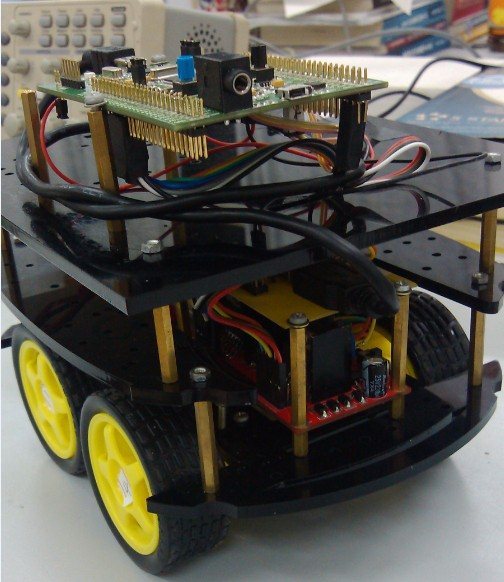
圖6-2 作品成果2
全部資料51hei下載地址:
 硬件設計及文檔.zip
(1.87 MB, 下載次數: 119)
硬件設計及文檔.zip
(1.87 MB, 下載次數: 119)
2018-6-8 17:10 上傳
點擊文件名下載附件
下載積分: 黑幣 -5
 軟件源代碼及文檔.rar
(639.46 KB, 下載次數: 126)
軟件源代碼及文檔.rar
(639.46 KB, 下載次數: 126)
2018-6-9 04:04 上傳
點擊文件名下載附件
下載積分: 黑幣 -5
 基于stm32f4的藍牙控制小車_論文.doc
(399 KB, 下載次數: 83)
基于stm32f4的藍牙控制小車_論文.doc
(399 KB, 下載次數: 83)
2018-6-8 17:10 上傳
點擊文件名下載附件
下載積分: 黑幣 -5


 QQ好友和群
 QQ空間
QQ空間 騰訊微博
騰訊微博 騰訊朋友
騰訊朋友 收藏
收藏 淘帖
淘帖 頂
頂 踩
踩

