|
上次我們一起學習用ESP8266開發板創建一個熱點,即發送射頻信號,就像自己的智能手機可以打開熱點,使得他人連接,我們智能手機的角色就是向外發送射頻信號,然而,用自己的手機去連接WiFi,那手機充當的角色就是接收射頻信號的啦。。 同理,零知ESP8266開發板是WiFi模塊,既然有發送信號的功能(創建熱點),當然也有接收信號的功能。這次的分享我們來讓ESP8266開發板接收信息,一起開始實現吧。
一、硬件
電腦,windows系統
零知ESP8266開發板
micro-usb線
二、
(1)軟件庫:
本示例使用零知-ESP8266來獲取天氣信息,首先需要安裝庫:

也可以在GitHub下載,注意要下載5.~版本 (2)解壓,然后打開零知開源軟件,界面如下:
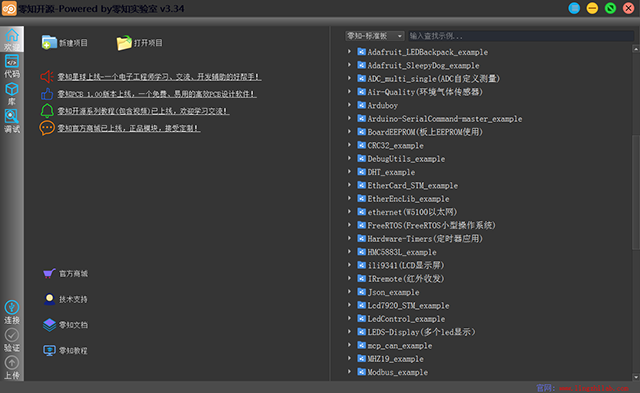
(3)安裝到庫
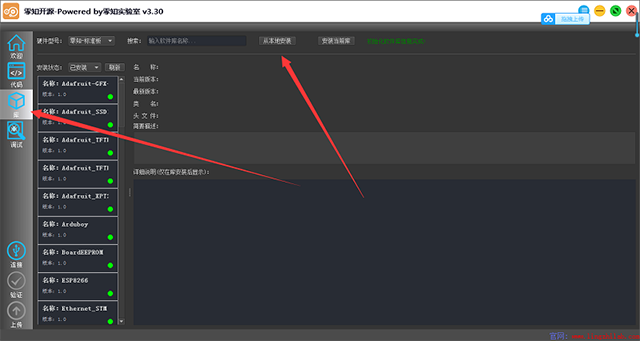
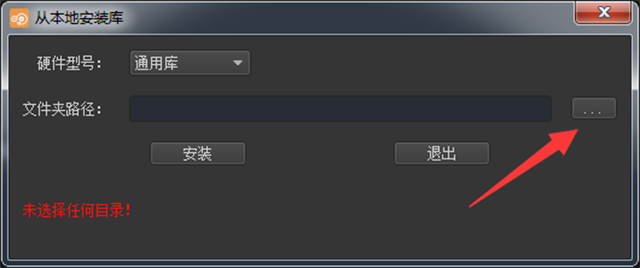
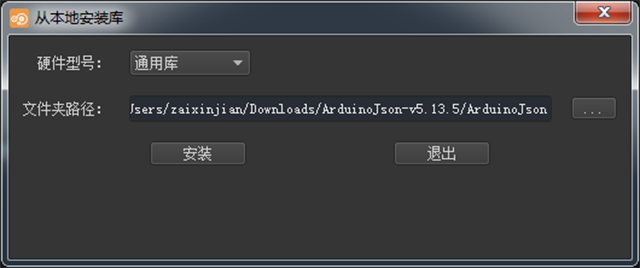
也可以解壓直接復制到你lingzhi_library存放的位置 這樣就完成安裝了,屆時要記得刷新一下,關閉軟件。 三、
重新打開零知開源軟件,然后燒錄以下代碼: - <font color="rgb(77, 77, 77)"><font face="""><font style="font-size: 16px">/**
- * Demo:
- * 演示Http請求天氣接口信息
- * @author 云上上云
- * @date 2019/06/01
- */
- #include <ESP8266WiFi.h>
- #include <ArduinoJson.h>
- #include <ESP8266HTTPClient.h>
-
- //以下三個定義為調試定義
- #define DebugBegin(baud_rate) Serial.begin(baud_rate)
- #define DebugPrintln(message) Serial.println(message)
- #define DebugPrint(message) Serial.print(message)
-
- const char* AP_SSID = "**********"; // **********-- 使用時請修改為當前你的 wifi ssid
- const char* AP_PSK = "**********"; // **********-- 使用時請修改為當前你的 wifi 密碼
- const char* HOST = "http://api點seniverse<font color="rgb(77, 77, 77)"><font face=""">點</font></font>com";
- const char* APIKEY = "wcmquevztdy1jpca"; //API KEY
- const char* CITY = "shenzhen";
- const char* LANGUAGE = "zh-Hans";//zh-Hans 簡體中文 會顯示亂碼
-
- const unsigned long BAUD_RATE = 115200; // serial connection speed
- const unsigned long HTTP_TIMEOUT = 5000; // max respone time from server
-
- // 我們要從此網頁中提取的數據的類型
- struct WeatherData {
- char city[16];//城市名稱
- char weather[32];//天氣介紹(多云...)
- char temp[16];//溫度
- char udate[32];//更新時間
- };
-
- HTTPClient http;
- String GetUrl;
- String response;
- WeatherData weatherData;
-
- void setup() {
- // put your setup code here, to run once:
- WiFi.mode(WIFI_STA); //設置esp8266 工作模式
- DebugBegin(BAUD_RATE);
- DebugPrint("Connecting to ");//
- DebugPrintln(AP_SSID);
- WiFi.begin(AP_SSID, AP_PSK); //連接wifi
- WiFi.setAutoConnect(true);
- while (WiFi.status() != WL_CONNECTED) {
- //這個函數是wifi連接狀態,返回wifi鏈接狀態
- delay(500);
- DebugPrint(".");
- }
- DebugPrintln("");
- DebugPrintln("WiFi connected");
- DebugPrintln("IP address: " + WiFi.localIP());
-
- //拼接get請求url
- GetUrl = String(HOST) + "/v3/weather/now.json?key=";
- GetUrl += APIKEY;
- GetUrl += "&location=";
- GetUrl += CITY;
- GetUrl += "&language=";
- GetUrl += LANGUAGE;
- //設置超時
- http.setTimeout(HTTP_TIMEOUT);
- //設置請求url
- http.begin(GetUrl);
- //以下為設置一些頭 其實沒什么用 最重要是后端服務器支持
- http.setUserAgent("esp8266");//用戶代理版本
- http.setAuthorization("esp8266","yssy");//用戶校驗信息
- }
-
- void loop() {
- //心知天氣 發送http get請求
- int httpCode = http.GET();
- if (httpCode > 0) {
- Serial.printf("[HTTP] GET... code: %d\n", httpCode);
- //判斷請求是否成功
- if (httpCode == HTTP_CODE_OK) {
- //讀取響應內容
- response = http.getString();
- DebugPrintln("Get the data from Internet!");
- DebugPrintln(response);
- //解析響應內容
- if (parseUserData(response, &weatherData)) {
- //打印響應內容
- printUserData(&weatherData);
- }
- }
- } else {
- Serial.printf("[HTTP] GET... failed, error: %s\n", http.errorToString(httpCode).c_str());
- }
- http.end();
- delay(1000);//每1s調用一次
- }
-
- /**
- * @Desc 解析數據 Json解析
- * 數據格式如下:
- * {
- * "results": [
- * {
- * "location": {
- * "id": "WX4FBXXFKE4F",
- * "name": "北京",
- * "country": "CN",
- * "path": "北京,北京,中國",
- * "timezone": "Asia/Shanghai",
- * "timezone_offset": "+08:00"
- * },
- * "now": {
- * "text": "多云",
- * "code": "4",
- * "temperature": "23"
- * },
- * "last_update": "2017-09-13T09:51:00+08:00"
- * }
- * ]
- *}
- */
- bool parseUserData(String content, struct WeatherData* weatherData) {
- // -- 根據我們需要解析的數據來計算JSON緩沖區最佳大小
- // 如果你使用StaticJsonBuffer時才需要
- // const size_t BUFFER_SIZE = 1024;
- // 在堆棧上分配一個臨時內存池
- // StaticJsonBuffer<BUFFER_SIZE> jsonBuffer;
- // -- 如果堆棧的內存池太大,使用 DynamicJsonBuffer jsonBuffer 代替
- DynamicJsonBuffer jsonBuffer;
-
- JsonObject& root = jsonBuffer.parseObject(content);
-
- if (!root.success()) {
- DebugPrintln("JSON parsing failed!");
- return false;
- }
-
- //復制我們感興趣的字符串
- strcpy(weatherData->city, root["results"][0]["location"]["name"]);
- strcpy(weatherData->weather, root["results"][0]["now"]["text"]);
- strcpy(weatherData->temp, root["results"][0]["now"]["temperature"]);
- strcpy(weatherData->udate, root["results"][0]["last_update"]);
- // -- 這不是強制復制,你可以使用指針,因為他們是指向“內容”緩沖區內,所以你需要確保
- // 當你讀取字符串時它仍在內存中
- return true;
- }
-
- // 打印從JSON中提取的數據
- void printUserData(const struct WeatherData* weatherData) {
- DebugPrintln("Print parsed data :");
- DebugPrint("City : ");
- DebugPrint(weatherData->city);
- DebugPrint(", \t");
- DebugPrint("Weather : ");
- DebugPrint(weatherData->weather);
- DebugPrint(",\t");
- DebugPrint("Temp : ");
- DebugPrint(weatherData->temp);
- DebugPrint(" C");
- DebugPrint(",\t");
- DebugPrint("Last Updata : ");
- DebugPrint(weatherData->udate);
- DebugPrintln("\r\n");
- }</font></font></font>
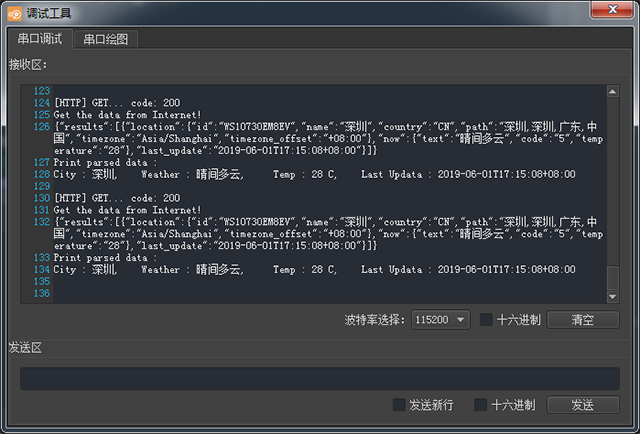
2、驗證,上傳程序。 四、點擊“調試”,就可看到結果啦,如下圖:
|