|
|
本帖最后由 qingyemurong 于 2020-9-24 22:13 編輯
STM32 CubeIDE 使用RT-Thread Nano
使用的 STM32 CubeIDE 版本 1.4
在STM32 CubeIDE中已經集成了RT-Thread Nano,可以直接在 IDE 中進行下載添加。工程文件附件自己下載。
- # 1、RT-Thread Nano pack 安裝
打開 STM32 CubeIDE --------->**Software Packs** ------------>**Manager Software Packs**界面(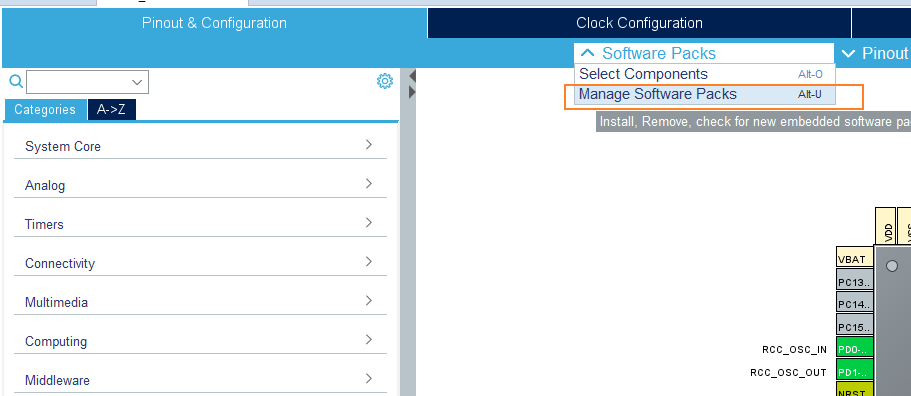
獲取 RT-Thread Nano 軟件包,需要在 STM32CubeIDE 中添加 [https://www.rt-thread.org/download/cube/RealThread.RT-Thread.pdsc](https://www.rt-thread.org/download/cube/RealThread.RT-Thread.pdsc)
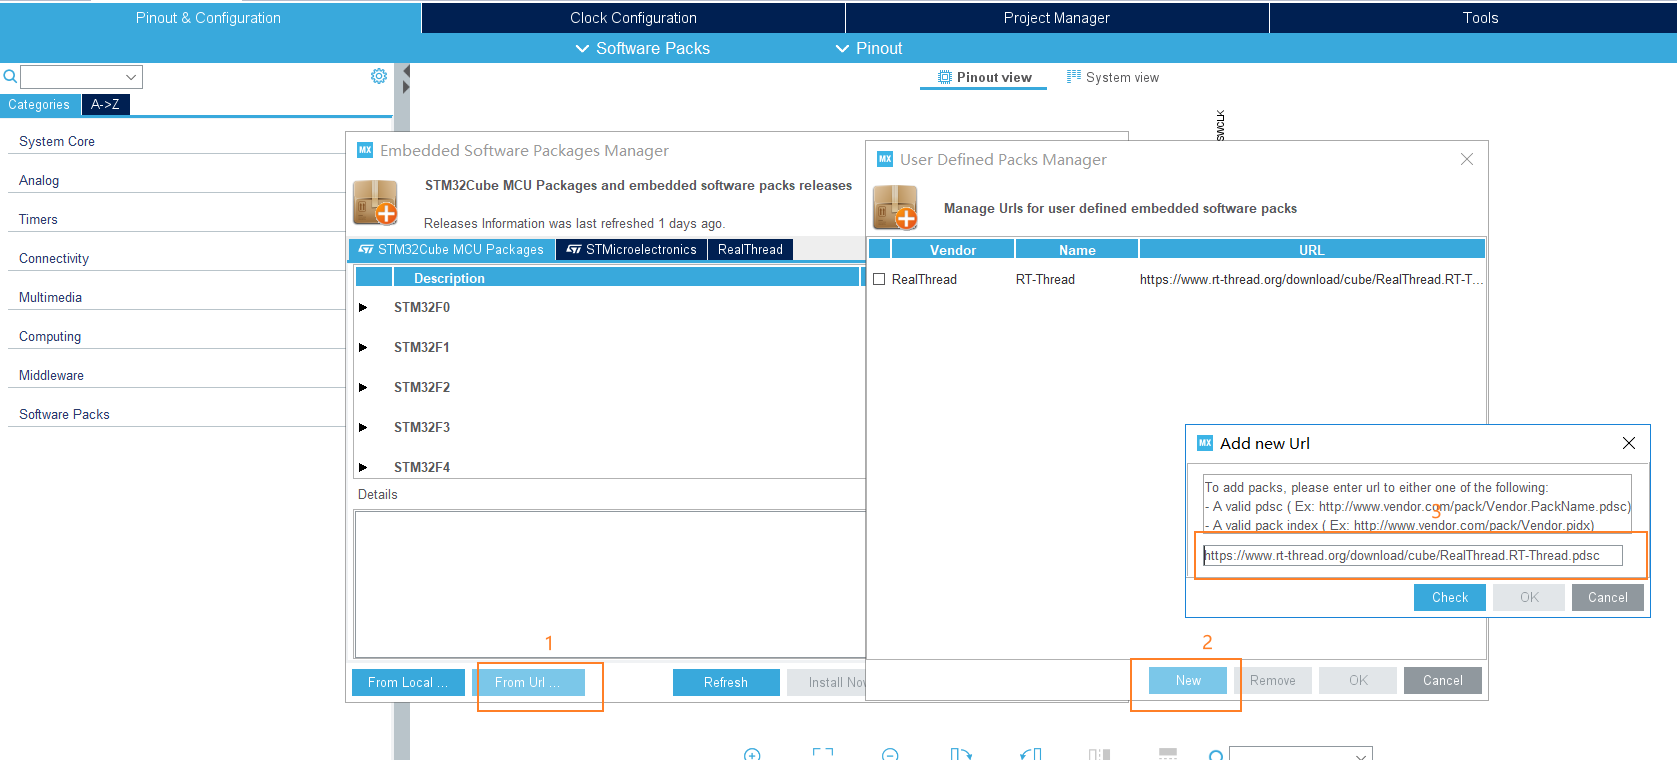
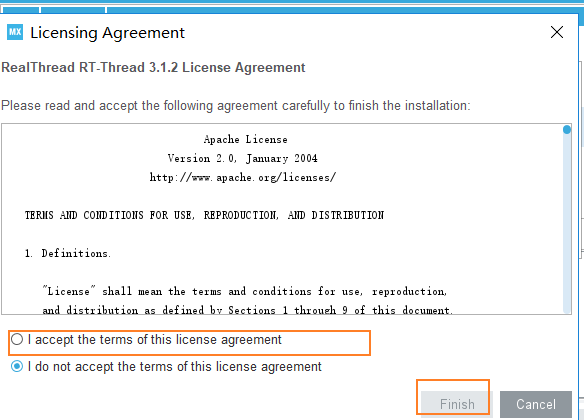
回到 Manage software packages 界面,就會發現 RT-Thread Nano 3.1.3 軟件包,選擇該軟件包,點擊 Install Now,如下圖所示(顏色填充表示已安裝)(
(
- # 2、創建工程添加 RT-Thread Nano
## 2.1 、創建一個基本工程
創建一個基本的工程文件,包含2個LED燈和USART1。
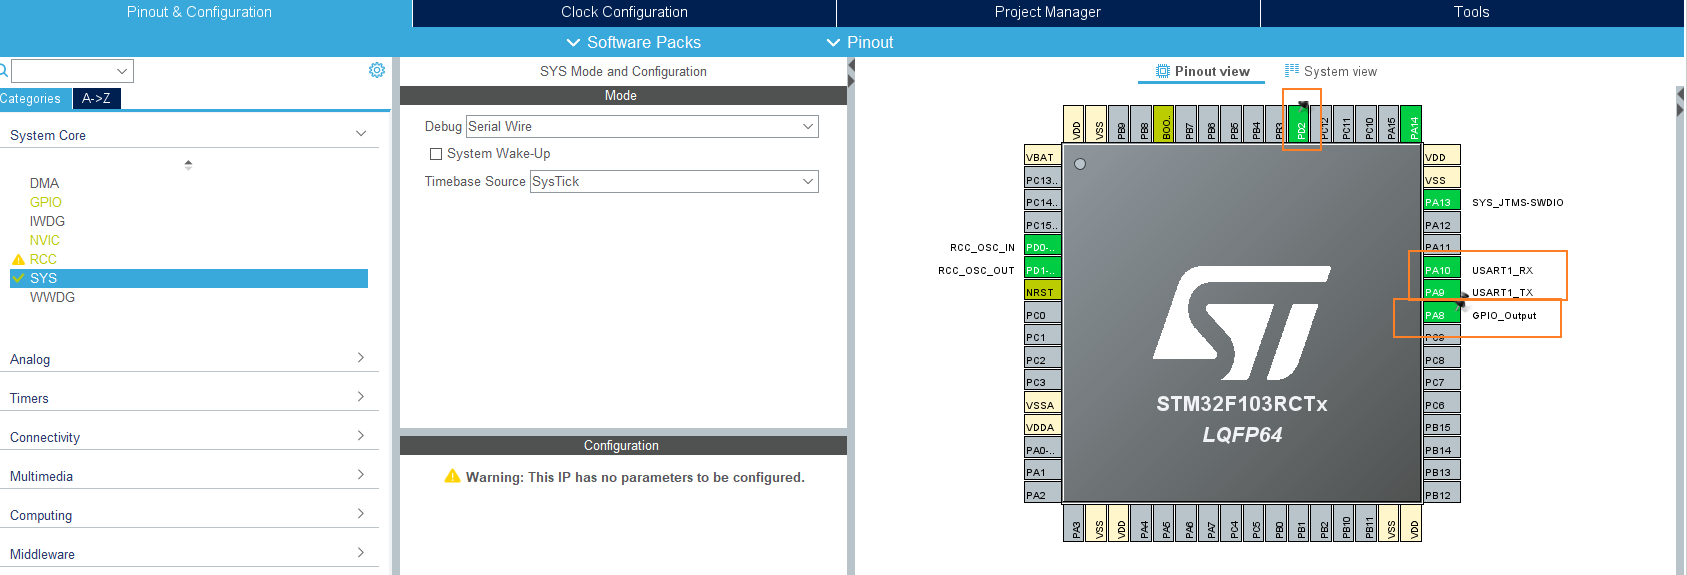
(
#
勾選 RT-Thread
(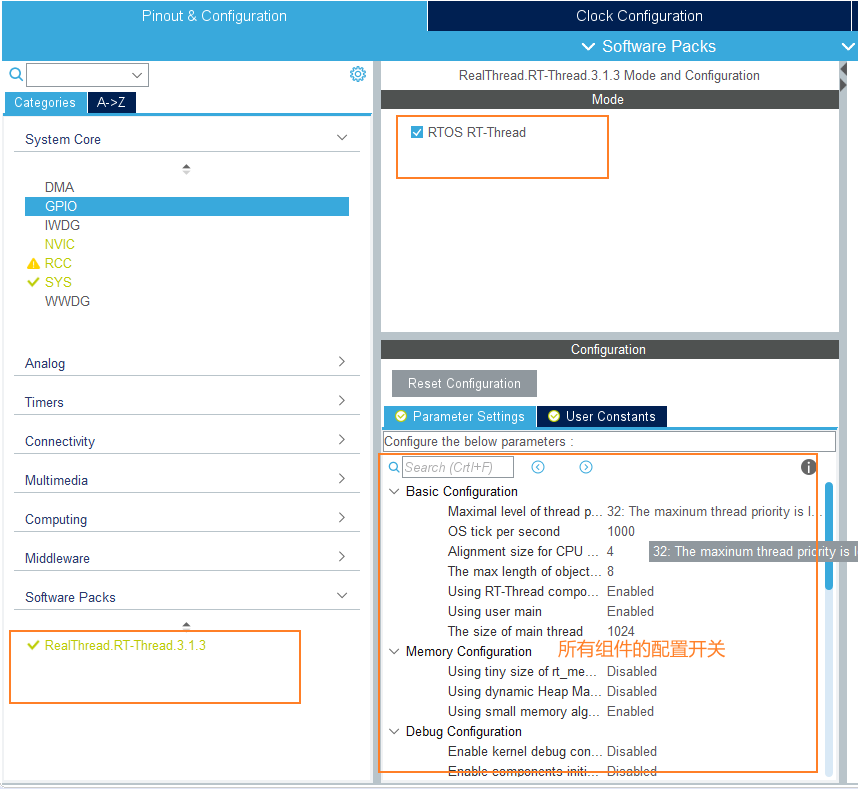 ?x-oss ?x-oss
中斷與異常處理
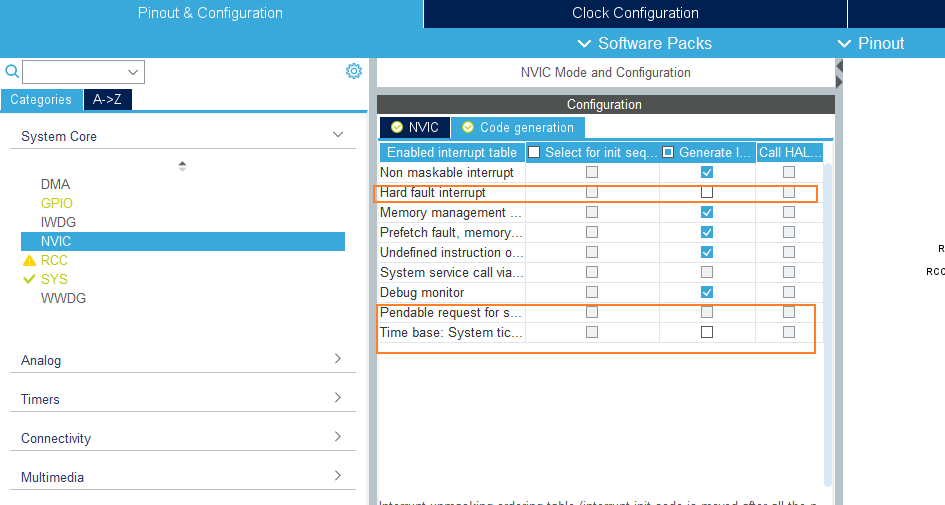
RT-Thread 操作系統重定義 **HardFault_Handler**、**PendSV_Handler**、**SysTick_Handler** 中斷函數,為了避免重復定義的問題,在生成工程之前,需要在中斷配置中,代碼生成的選項中,取消選擇三個中斷函數(對應注釋選項是 Hard fault interrupt, Pendable request, Time base :System tick timer),最后點擊生成代碼,具體操作如下圖中
(
# 3、工程代碼修改
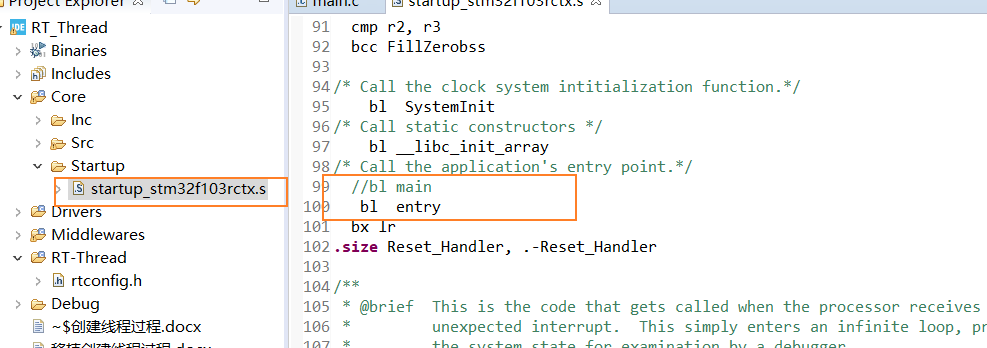
1 、修改啟動文件 startup_stm32f103rctx.s
**bl main** 修改為 **bl entry**
(
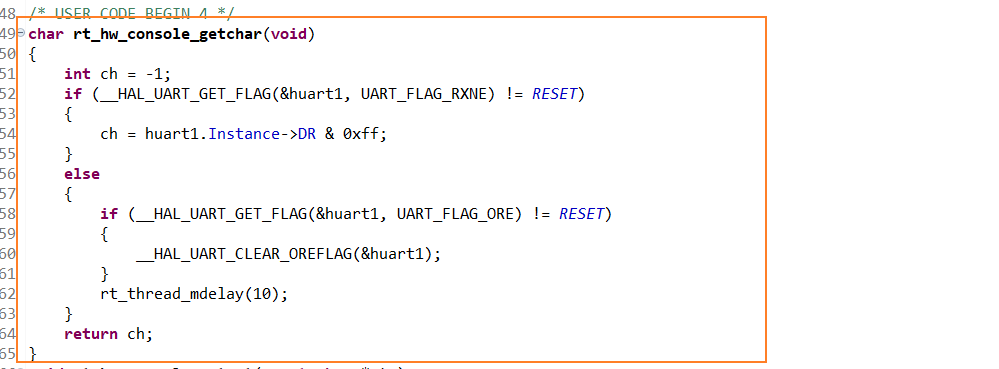
端口映射,函數可以放在main.c文件里面。
(
(
- /* USER CODE BEGIN 4 */
- char rt_hw_console_getchar(void)
- {
- int ch = -1;
- if (__HAL_UART_GET_FLAG(&huart1, UART_FLAG_RXNE) != RESET)
- {
- ch = huart1.Instance->DR & 0xff;
- }
- else
- {
- if (__HAL_UART_GET_FLAG(&huart1, UART_FLAG_ORE) != RESET)
- {
- __HAL_UART_CLEAR_OREFLAG(&huart1);
- }
- rt_thread_mdelay(10);
- }
- return ch;
- }
- void rt_hw_console_output(const char *str)
- {
- rt_size_t i = 0, size = 0;
- char a = '\r';
- __HAL_UNLOCK(&huart1);
- size = rt_strlen(str);
- for (i = 0; i < size; i++)
- {
- if (*(str + i) == '\n')
- {
- ITM_SendChar(a);
- HAL_UART_Transmit(&huart1, (uint8_t*) &a, 1, 1);
- }
- HAL_UART_Transmit(&huart1, (uint8_t*) (str + i), 1, 1);
- }
- }
- /* USER CODE END 4 */
## 3.3 、編寫線程文件
創建一個**app_rt_thread.c**文件用于保存線程代碼
(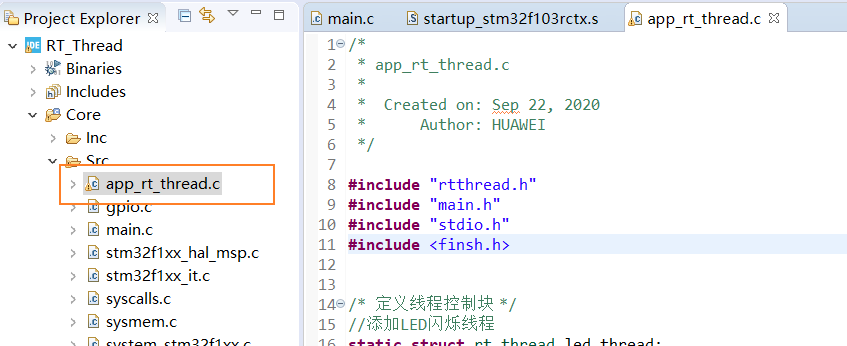
app_rt_thread.c文件內容:
- #include "rtthread.h"
- #include "main.h"
- #include "stdio.h"
- #include <finsh.h>
- /* 定義線程控制塊 */
- //添加LED閃爍線程
- static struct rt_thread led_thread;
- static char led_thread_stack[256];
- static void led_thread_entry(void *parameter);
- int MX_RT_Thread_Init(void);
- int MX_RT_Thread_Init(void)
- {
- //初始化線程
- rt_err_t rst;
- rst = rt_thread_init(&led_thread,
- (const char *)"ledshine", /* 線程名字 */
- led_thread_entry, /* 線程入口函數 */
- RT_NULL, /* 線程入口函數參數 */
- &led_thread_stack[0],
- sizeof(led_thread_stack), /* 線程棧大小 */
- RT_THREAD_PRIORITY_MAX-2, /* 線程的優先級 */
- 20); /* 線程時間片 */
- if(rst == RT_EOK)
- {///* 啟動線程,開啟調度 */
- rt_thread_startup(&led_thread);
- }
- }
- /*
- *************************************************************************
- * 線程定義
- *************************************************************************
- */
- static void led_thread_entry(void *parameter)
- {
- while(1)
- {
- rt_kprintf("led1_thread running,LED1_ON\r\n");
- HAL_GPIO_WritePin(GPIOA, GPIO_PIN_8, GPIO_PIN_RESET);
- rt_thread_mdelay(500);
- HAL_GPIO_WritePin(GPIOA, GPIO_PIN_8, GPIO_PIN_SET);
- rt_thread_mdelay(500);
- }
- }
- MSH_CMD_EXPORT(led_thread_entry,thread running);
- ## 3.4 、main.c 修改
- (
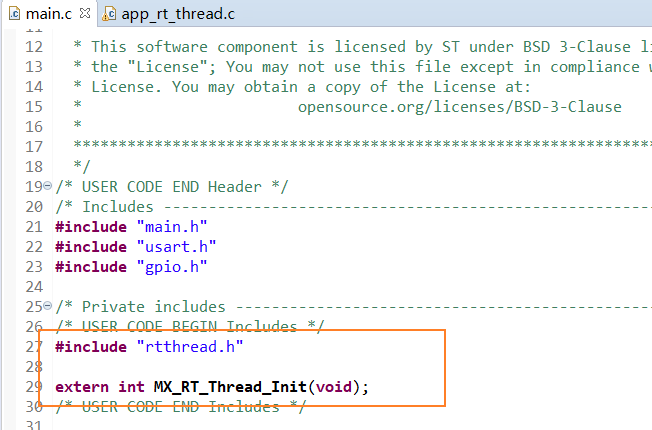
- /* USER CODE BEGIN Includes */
- #include "rtthread.h"
- extern int MX_RT_Thread_Init(void);
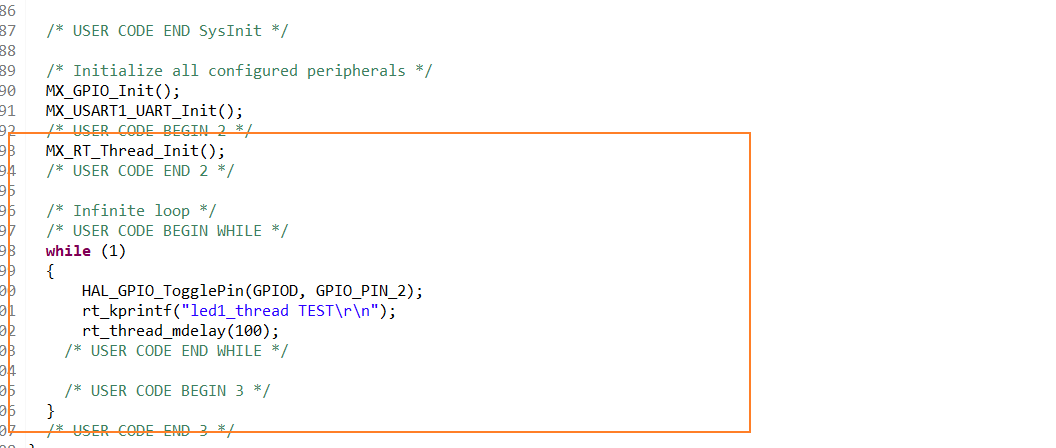
(
- int main(void)
- {
- /* USER CODE BEGIN 1 */
- /* USER CODE END 1 */
- /* MCU Configuration--------------------------------------------------------*/
- /* Reset of all peripherals, Initializes the Flash interface and the Systick. */
- HAL_Init();
- /* USER CODE BEGIN Init */
- /* USER CODE END Init */
- /* Configure the system clock */
- SystemClock_Config();
- /* USER CODE BEGIN SysInit */
- /* USER CODE END SysInit */
- /* Initialize all configured peripherals */
- MX_GPIO_Init();
- MX_USART1_UART_Init();
- /* USER CODE BEGIN 2 */
- MX_RT_Thread_Init();
- /* USER CODE END 2 */
- /* Infinite loop */
- /* USER CODE BEGIN WHILE */
- while (1)
- {
- HAL_GPIO_TogglePin(GPIOD, GPIO_PIN_2);
- rt_kprintf("led1_thread TEST\r\n");
- rt_thread_mdelay(100);
- /* USER CODE END WHILE */
- /* USER CODE BEGIN 3 */
- }
- /* USER CODE END 3 */
- }
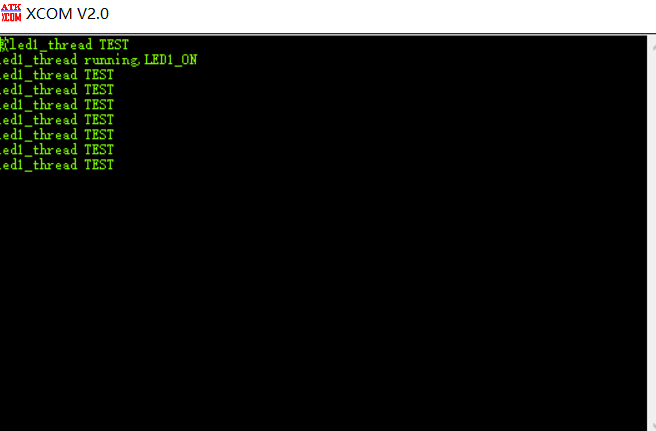
串口輸出:
(
|
-

-
RT_Thread.7z
2020-9-24 22:10 上傳
點擊文件名下載附件
下載積分: 黑幣 -5
1.61 MB, 下載次數: 15, 下載積分: 黑幣 -5
工程文件
|