因為在研究 成品 激光雕刻機 時, 發現 GRBL 代碼基本上都改了,主要是 通訊接通 和上位機 界面。
本節筆記開始學習下位機,希望能夠理解其控制基本原理。
下載winavr(http://sourceforge.net/projects/winavr/files/),是一個編譯器,
打開軟件如下,
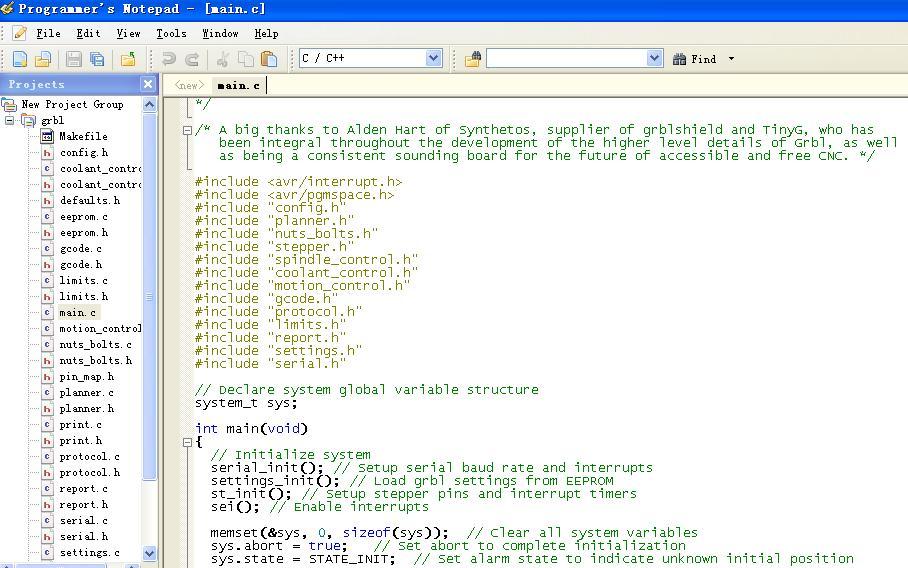
把GRBL下位機源文件中的 *.h 和 *.c 文件加入,再加入 makefile 文件, 點擊 make all
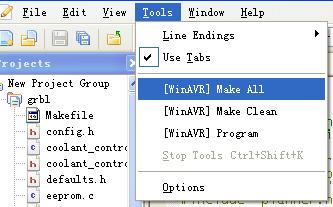
即可生成 hex 文件。
*************************************************
GRBL 自帶文檔 的介紹,大致結構如下,
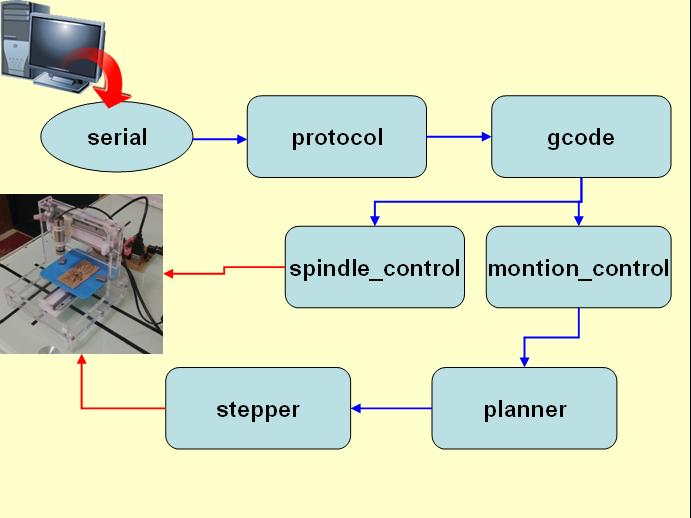
'protocol' : Accepts command lines from the serial port and passes them to 'gcode' for execution. Provides status responses for each command. Also manages run-time commands set by the serial interrupt.
'gcode' : Recieves gcode from 'protocol', parses it according to the current state
of the parser and issues commands via '..._control' modules
'spindle_control' : Commands for controlling the spindle.
'motion_control' : Accepts motion commands from 'gcode' and passes them to the 'planner'. This module
represents the public interface of the planner/stepper duo.
'planner' : Receives linear motion commands from 'motion_control' and adds them to the plan of
prepared motions. It takes care of continuously optimizing the acceleration profile
as motions are added.
'stepper' : Executes the motions by stepping the steppers according to the plan.
-------------------------------------------------------------
*****************************
對 serial.h 的理解
定義串口通訊底層函數
*****************************
#ifndef serial_h
#define serial_h
內容
#endif
標志頭文件格式,防止 頭文件 被重復引用。
******************************
內容1
#include "nuts_bolts.h"
包含頭文件 nuts_bolts.h
nuts_bolts.h - Header file for shared definitions, variables, and functions.
共享 定義、變量和函數
************************
內容2
#ifndef RX_BUFFER_SIZE
#define RX_BUFFER_SIZE 128
#endif
從字面意思可以看出,定義接收緩存 為 128。
同理,
#ifndef TX_BUFFER_SIZE
#define TX_BUFFER_SIZE 64
#endif
***********************
內容3
#define SERIAL_NO_DATA 0xff
從字面意思,串口無數據
不知道要用在哪里?
***********************
內容4
#ifdef ENABLE_XONXOFF
#define RX_BUFFER_FULL 96 // XOFF high watermark
#define RX_BUFFER_LOW 64 // XON low watermark
#define SEND_XOFF 1
#define SEND_XON 2
#define XOFF_SENT 3
#define XON_SENT 4
#define XOFF_CHAR 0x13
#define XON_CHAR 0x11
#endif
不知道怎么用? 也不知道 watermark 水印 是什么意思?
************************
內容5
void serial_init();
字面理解,串口初始化函數。
************************
內容6
void serial_write(uint8_t data);
字面理解,將數據 data 寫入串口。
************************
內容7
uint8_t serial_read();
字面理解, 從串口讀出數據。
***********************
內容8
void serial_reset_read_buffer();
Reset and empty data in read buffer.
Used by e-stop and reset.
清空讀緩存。
***************************************************
winavr編程提示,
uint8_t 在 stdint.h 被定義,typedef unsigned char uint8_t
從 serial.h 上看, serial.h 定義了 串口通訊的底層函數,即使不理解如何實現關系也不大,只需記住函數功能就可以了,如何實現已經被 serial.c 封裝了。
-------------------------------------------------------------------------
**************************
serial.c 的理解 上
只需要理解功能,怎樣實現可以暫時簡單了解
low level functions for sending and recieving bytes via the serial port
***************************
內容1
#include
#include "serial.h"
#include "config.h"
#include "motion_control.h"
#include "protocol.h"
需要的頭文件,
1、 定義中斷 ISR,
2、serial.h 好理解
3、config.h 該文件 compile time configuration
This file contains compile-time configurations for Grbl's internal system.
For the most part, users will not need to directly modify these, but they are here for specific needs, i.e. performance tuning or adjusting to non-typical machines.
這個文件很特殊,90%的內容是解釋,只有10%是代碼。
需要專門一篇文章來學習。
4、motion_control.h
- high level interface for issuing motion commands
會另外開一篇文章學習
5、protocol.h
- the serial protocol master control unit
也會另外開一篇文章學習。
*****************************************
內容2
uint8_t rx_buffer[RX_BUFFER_SIZE];
uint8_t rx_buffer_head = 0;
uint8_t rx_buffer_tail = 0;
uint8_t tx_buffer[TX_BUFFER_SIZE];
uint8_t tx_buffer_head = 0;
volatile uint8_t tx_buffer_tail = 0;
目測是環形隊列格式,輸出 和 接收 都是 采用環形隊列,感覺會有一定難度
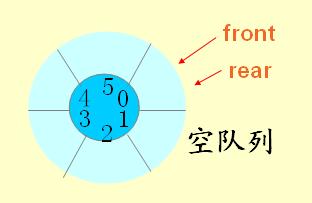
tx_buffer_tail 前 加了一個 volatile 聲明,說明 tx_buffer_tail 可能會被 幾個 子程序 共享。
*******************************************
內容3
#ifdef ENABLE_XONXOFF
volatile uint8_t flow_ctrl = XON_SENT; // Flow control state variable
static uint8_t get_rx_buffer_count()
{
if (rx_buffer_head == rx_buffer_tail)
{ return(0); }
if (rx_buffer_head < rx_buffer_tail)
{ return(rx_buffer_tail-rx_buffer_head); }
return (RX_BUFFER_SIZE - (rx_buffer_head-rx_buffer_tail));
}
#endif
Returns the number of bytes in the RX buffer.
This replaces a typical byte counter to prevent the interrupt and main programs from writing to the counter at the same time.
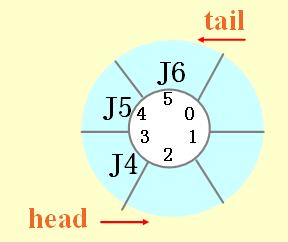
用來判斷 緩存的字節數量。
*****************************
內容4
void serial_init()
{
Set baud rate();
enable rx and tx();
enable interrupt on complete reception of a byte();
}
利用偽代碼來理解整體結構,
然后,細化,
**************************
1、Set baud rate();
#if BAUD_RATE < 57600
uint16_t UBRR0_value = ((F_CPU / (8L * BAUD_RATE)) - 1)/2 ;
UCSR0A &= ~(1 << U2X0); // baud doubler off - Only needed on Uno XXX
#else
uint16_t UBRR0_value = ((F_CPU / (4L * BAUD_RATE)) - 1)/2;
UCSR0A |= (1 << U2X0); // baud doubler on for high baud rates, i.e. 115200
#endif
UBRR0H = UBRR0_value >> 8;
UBRR0L = UBRR0_value;
這里需要查看 avr 串口設置資料,涉及到寄存器配置,我不是很熟悉,感覺和找到的代碼有些區別,暫時先繼續。
2、enable rx and tx();
UCSR0B |= 1<<rxen0;
UCSR0B |= 1<<txen0;
通過寄存器賦值實現,RXEN0 和 TXEN0 是寄存器。
3、enable interrupt on complete reception of a byte();
UCSR0B |= 1<<rxcie0;
如果對 avr 串口編程很熟悉的話,上面的代碼應該是 格式化的,就是遇到類似情況,copy paste 就可以了。
****************************************
內容5
void serial_write(uint8_t data)
{
Calculate next head();
Wait until there is space in the buffer();
Store data and advance head();
Enable Data Register Empty Interrupt to make sure tx-streaming is running();
}
同樣利用偽代碼 熟悉結構,然后細化
1、Calculate next head();
uint8_t next_head = tx_buffer_head + 1;
if (next_head == TX_BUFFER_SIZE)
{ next_head = 0; }
當next_head == TX_BUFFER_SIZE 時,表面走了一圈了,要再 從 0 開始。
2、 Wait until there is space in the buffer();
while (next_head == tx_buffer_tail)
{
if (sys.execute & EXEC_RESET)
{ return; } // Only check for abort to avoid an endless loop.
}
當next_head == tx_buffer_tail 時,說明環形隊列中已經沒有空間了,在這里循環等待。循環內部判斷 sys狀態,避免死循環。
3、Store data and advance head();
tx_buffer[tx_buffer_head] = data;
tx_buffer_head = next_head;
好理解
4、 Enable Data Register Empty Interrupt to make sure tx-streaming is running();
UCSR0B |= (1 << UDRIE0);
需要看avr 串口方面資料。
***************************************
內容太多了,將 serial.c 理解 分為 兩部分。
--------------------------------------------------------------------------
**************************
serial.c 的理解 下
只需要理解功能,怎樣實現可以暫時簡單了解
low level functions for sending and recieving bytes via the serial port
***************************
內容6
ISR(SERIAL_UDRE)
{
Temporary tx_buffer_tail();
Send a byte from the buffer();
Update tail position();
Turn off Data Register Empty Interrupt to stop tx-streaming if this concludes the transfer();
}
這是AVR的中斷,//USART0接收中斷 // Data Register Empty Interrupt handler
其中, #define SERIAL_UDRE USART_UDRE_vect (pin_map.h 中)
http://blog.sina.com.cn/s/blog_55c3ae71010005d8.html
可以參考http://blog.sina.com.cn/s/blog_694edd930100z24y.html
// 數據從發送寄存器完整移動到移位寄存器
// 中斷或輪詢模式,均是寫數據清零
// 每一個字符character發生一次
Temporary tx_buffer_tail()
uint8_t tail = tx_buffer_tail;
#ifdef ENABLE_XONXOFF
if (flow_ctrl == SEND_XOFF) {
UDR0 = XOFF_CHAR;
flow_ctrl = XOFF_SENT;
} else if (flow_ctrl == SEND_XON) {
UDR0 = XON_CHAR;
flow_ctrl = XON_SENT;
} else
#endif
{
#ifdef 和 #endif 之間的代碼暫時不理解。
Send a byte from the buffer();
UDR0 = tx_buffer[tail];
UDR0是數據寄存器,用來放置緩存。
Update tail position();
tail++;
if (tail == TX_BUFFER_SIZE)
{ tail = 0; }
tx_buffer_tail = tail;
}
好理解
Turn off Data Register Empty Interrupt to stop tx-streaming if this concludes the transfer();
if (tail == tx_buffer_head)
{ UCSR0B &= ~(1 << UDRIE0); }
沒有數據了,設置寄存器(下面為通用的,這里 n 為0,參考 http://www.amobbs.com/archiver/tid-3415797.html),
//UCSRnB USART控制和狀態寄存器B
// -----------------------------------------------------------------
// | RXCIEn| TXCIEn| UDRIEn| RXENn | TXENn | UCSZn2| RXB8n | TXB8n |
// -----------------------------------------------------------------
// RXCIEn:接收結束中斷使能
// TXCIEn:發送結束中斷使能
// UDRIEn:USART數據寄存器空中使能
// RXENn:接收使能
// TXENn:發送使能
// UCSZn2:字符長度,具體見下面
// RXB8n:接收數據位8
// TXB8n:發送數據位8
可以看出,禁止了 USART數據寄存器空中使能。
理解程度不是很詳細,因為暫時不需要,不影響 理解 整體。
***********************************************
內容7
uint8_t serial_read()
{
if (rx_buffer_head == rx_buffer_tail)
{
return SERIAL_NO_DATA;
}
else {
uint8_t data = rx_buffer[rx_buffer_tail];
rx_buffer_tail++;
if (rx_buffer_tail == RX_BUFFER_SIZE)
{ rx_buffer_tail = 0; }
#ifdef ENABLE_XONXOFF
if ((get_rx_buffer_count() < RX_BUFFER_LOW) && flow_ctrl == XOFF_SENT)
{
flow_ctrl = SEND_XON;
UCSR0B |= (1 << UDRIE0); // Force TX
}
#endif
return data;
}
}
從緩存中讀出數據。
*******************************
內容8
ISR(SERIAL_RX)
{
uint8_t data = UDR0;
uint8_t next_head;
Pick off runtime command characters directly from the serial stream. These characters are not passed into the buffer, but these set system state flag bits for runtime execution();
Write character to buffer();
Write data to buffer unless it is full();
}
其中,#define SERIAL_RX USART_RX_vect
中斷接受函數
1、Pick off runtime command characters directly from the serial stream. These characters are not passed into the buffer, but these set system state flag bits for runtime execution();
switch (data) {
case CMD_STATUS_REPORT: sys.execute |= EXEC_STATUS_REPORT; break; // Set as true
case CMD_CYCLE_START: sys.execute |= EXEC_CYCLE_START; break; // Set as true
case CMD_FEED_HOLD: sys.execute |= EXEC_FEED_HOLD; break; // Set as true
case CMD_RESET: mc_reset(); break; // Call motion control reset routine.
設置執行系統狀態標志。
2、Write character to buffer();
default: // Write character to buffer
next_head = rx_buffer_head + 1;
if (next_head == RX_BUFFER_SIZE)
{ next_head = 0; }
3、Write data to buffer unless it is full()
if (next_head != rx_buffer_tail) {
rx_buffer[rx_buffer_head] = data;
rx_buffer_head = next_head;
#ifdef ENABLE_XONXOFF
if ((get_rx_buffer_count() >= RX_BUFFER_FULL) && flow_ctrl == XON_SENT) {
flow_ctrl = SEND_XOFF;
UCSR0B |= (1 << UDRIE0); // Force TX
}
#endif
}
}
看來 XONXOFF的很礙事,去掉就簡潔很多了。
*****************************************
內容9
void serial_reset_read_buffer()
{
rx_buffer_tail = rx_buffer_head;
#ifdef ENABLE_XONXOFF
flow_ctrl = XON_SENT;
#endif
}
復位。
************************************
總體上,需要理解環形隊列(這里沒有分析,head 是用來寫入數據的index,tail 是用來導出數據的index),就能理解50% 了,另外 對AVR 串口寄存器如果熟悉的話,就又能理解30%了。
剩下的20% 就是 XONXOFF 還沒理解。
摘錄AVR 串口寄存器
void init_uart(void)
{
//UDRn USART I/O數據寄存器, 不可用讀修改寫命令操作, 否則會改變FIFO狀態
//UCSRnA USART控制和狀態寄存器A
// -----------------------------------------------------------------
// |RXCn |TXCn | UDREn |FEn|DORn |UPEn |U2Xn | MPCMn |
// -----------------------------------------------------------------
// RXCn:USART接收結束標志
// TXCn:USART發送結束標志,寫1可清除
// UDREn:USART數據寄存器為空標志,只有該標志為1才數據才可寫入UDR0
// FEn:幀錯誤,未正確收到停止位
// DORn:數據過速
// UPEn:奇偶效驗錯誤
// U2Xn:倍速發送,僅對異步操作有影響
// MPCMn:多處理器通訊模式
//UCSRnB USART控制和狀態寄存器B
// -----------------------------------------------------------------
// | RXCIEn| TXCIEn| UDRIEn| RXENn | TXENn | UCSZn2| RXB8n | TXB8n |
// -----------------------------------------------------------------
// RXCIEn:接收結束中斷使能
// TXCIEn:發送結束中斷使能
// UDRIEn:USART數據寄存器空中使能
// RXENn:接收使能
// TXENn:發送使能
// UCSZn2:字符長度,具體見下面
// RXB8n:接收數據位8
// TXB8n:發送數據位8
//UCSRxC USART控制和狀態寄存器C
// -----------------------------------------------------------------
// | - | UMSELn| UPMn1 | UPMn0 | USBSn | UCSZn1| UCXZn0| UCPOLn|
// -----------------------------------------------------------------
// UMSELn:模式選擇,0為異步操作,1為同步操作
// UPMn1,UPMn0:奇偶效驗模式,00禁止,01保留,10偶效驗,11奇校驗
// USBSn:停止位選擇,0為1位停止位,1為2位停止位
// UCSZn2,UCSZn0:字符長度,000為5位, 001為 6位,010為7位, 011為8位
// 100為保留,101為保留,110為保留,111為9位
// UCPOLn:時鐘極性,(異步模式應清零)
// UCPOL0 發送數據位置 接收數據位置
// 0 XCK0上升沿 XCK0下降沿
// 1 XCK0下降沿 XCK0上升沿
//UBRRnL和UBRRnH USART波特率寄存器, UBRRnH15:12為保留位:
// -----------------------------------------------------------------
// | - | - | - | - | BIT11 | BIT10 | BIT09 | BIT08 |
// -----------------------------------------------------------------
// -----------------------------------------------------------------
// | BIT07 | BIT06 | BIT05 | BIT04 | BIT03 | BIT02 | BIT01 | BIT00 |
// -----------------------------------------------------------------
}
************************************
serial 中 環形隊列
簡化后
************************************
去除了 如果 隊列 滿了 或者 空了 等判斷;
也忽略了 讀入的是 某種命令;
也忽略 XONXOFF
哇~~~~,這個世界清凈了,現在大家知道,
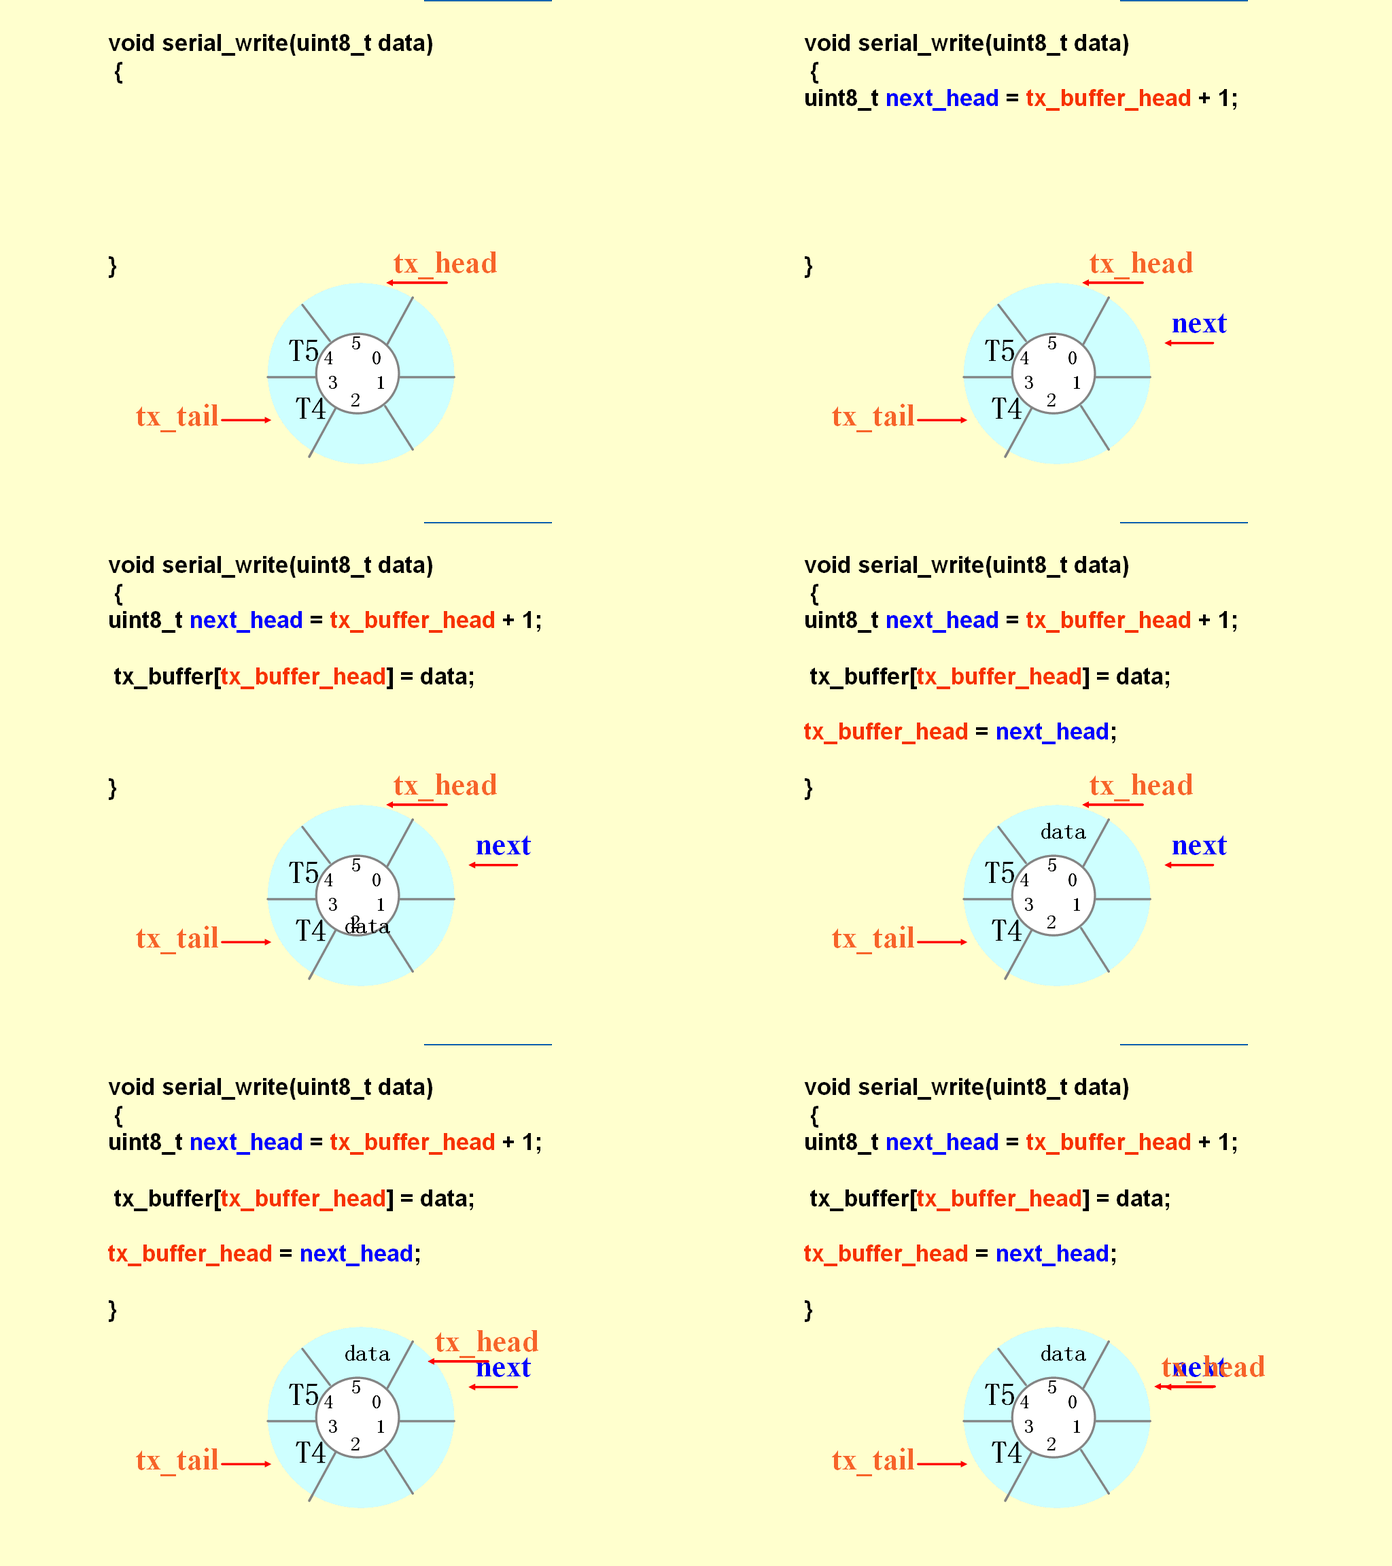
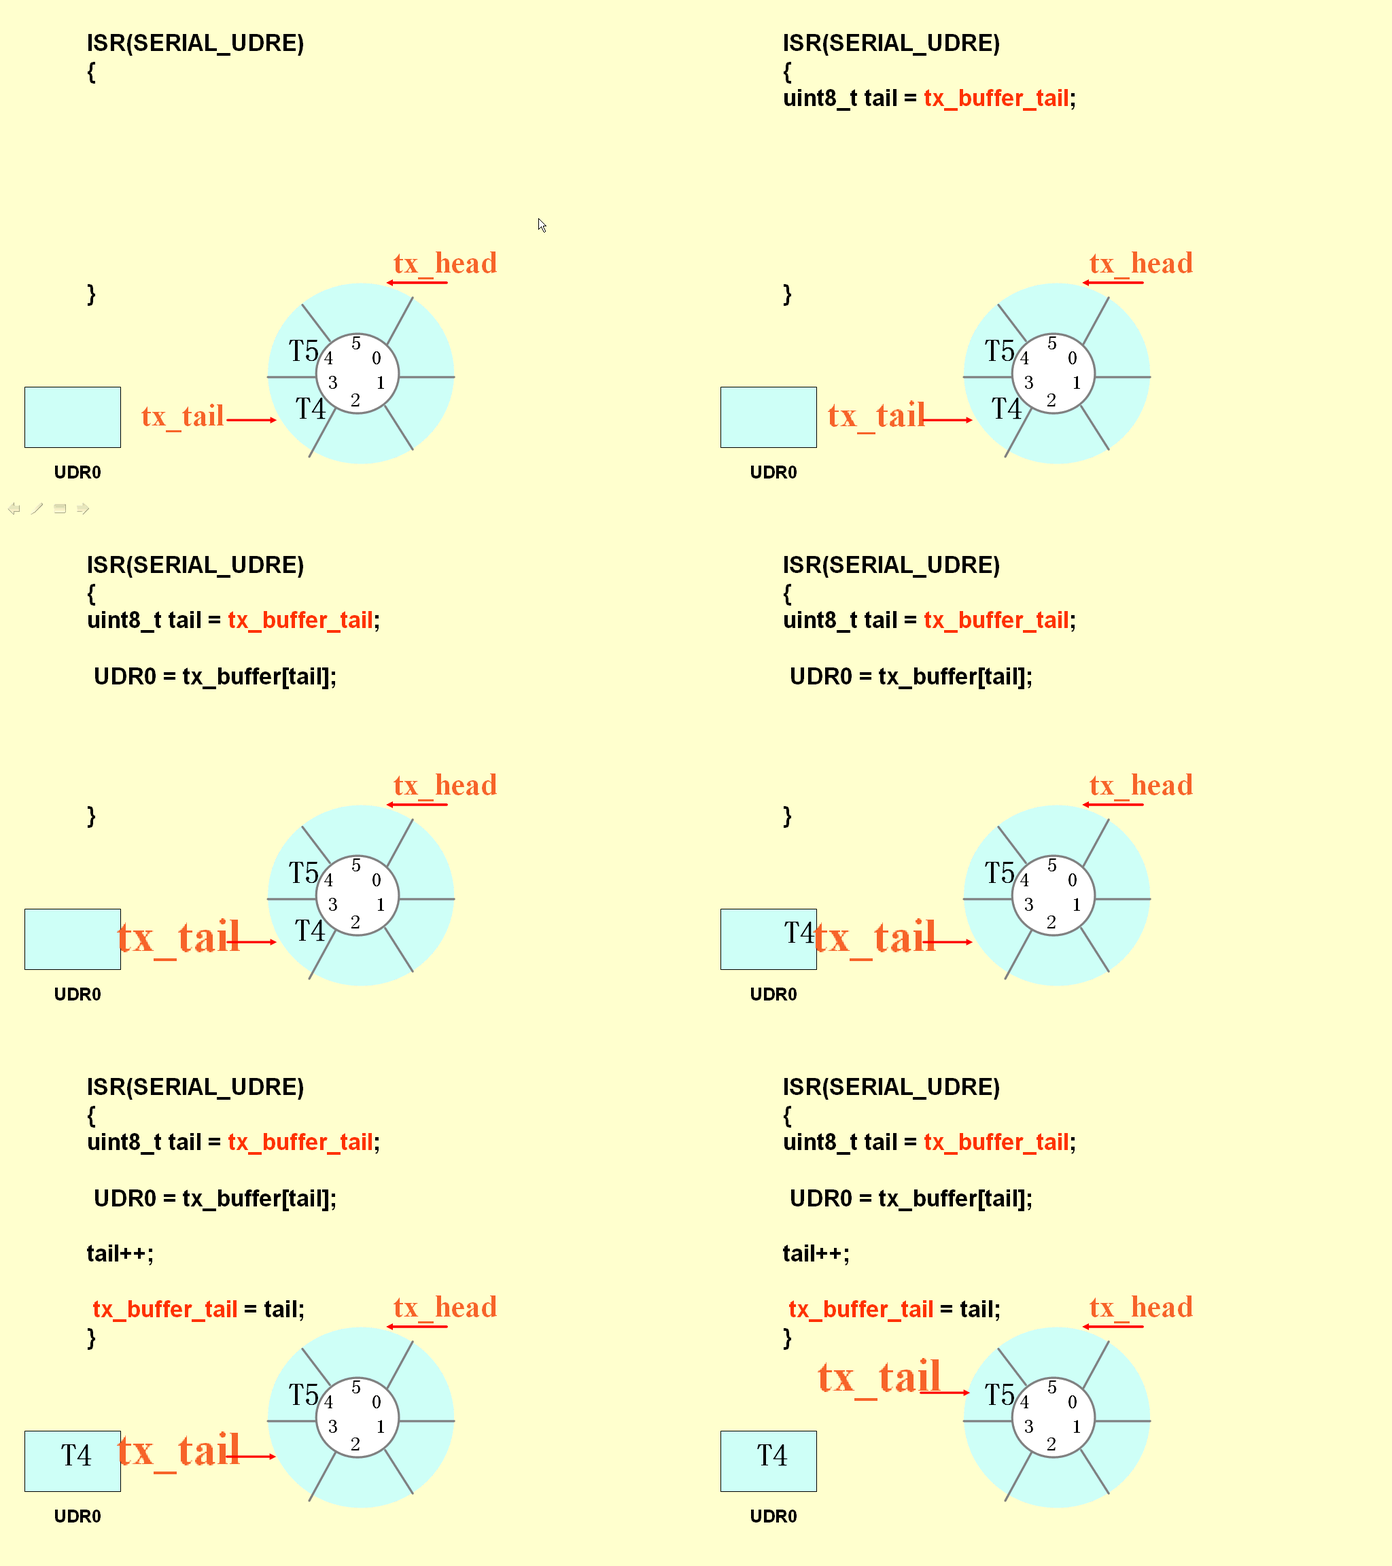
TX 隊列
*****************************
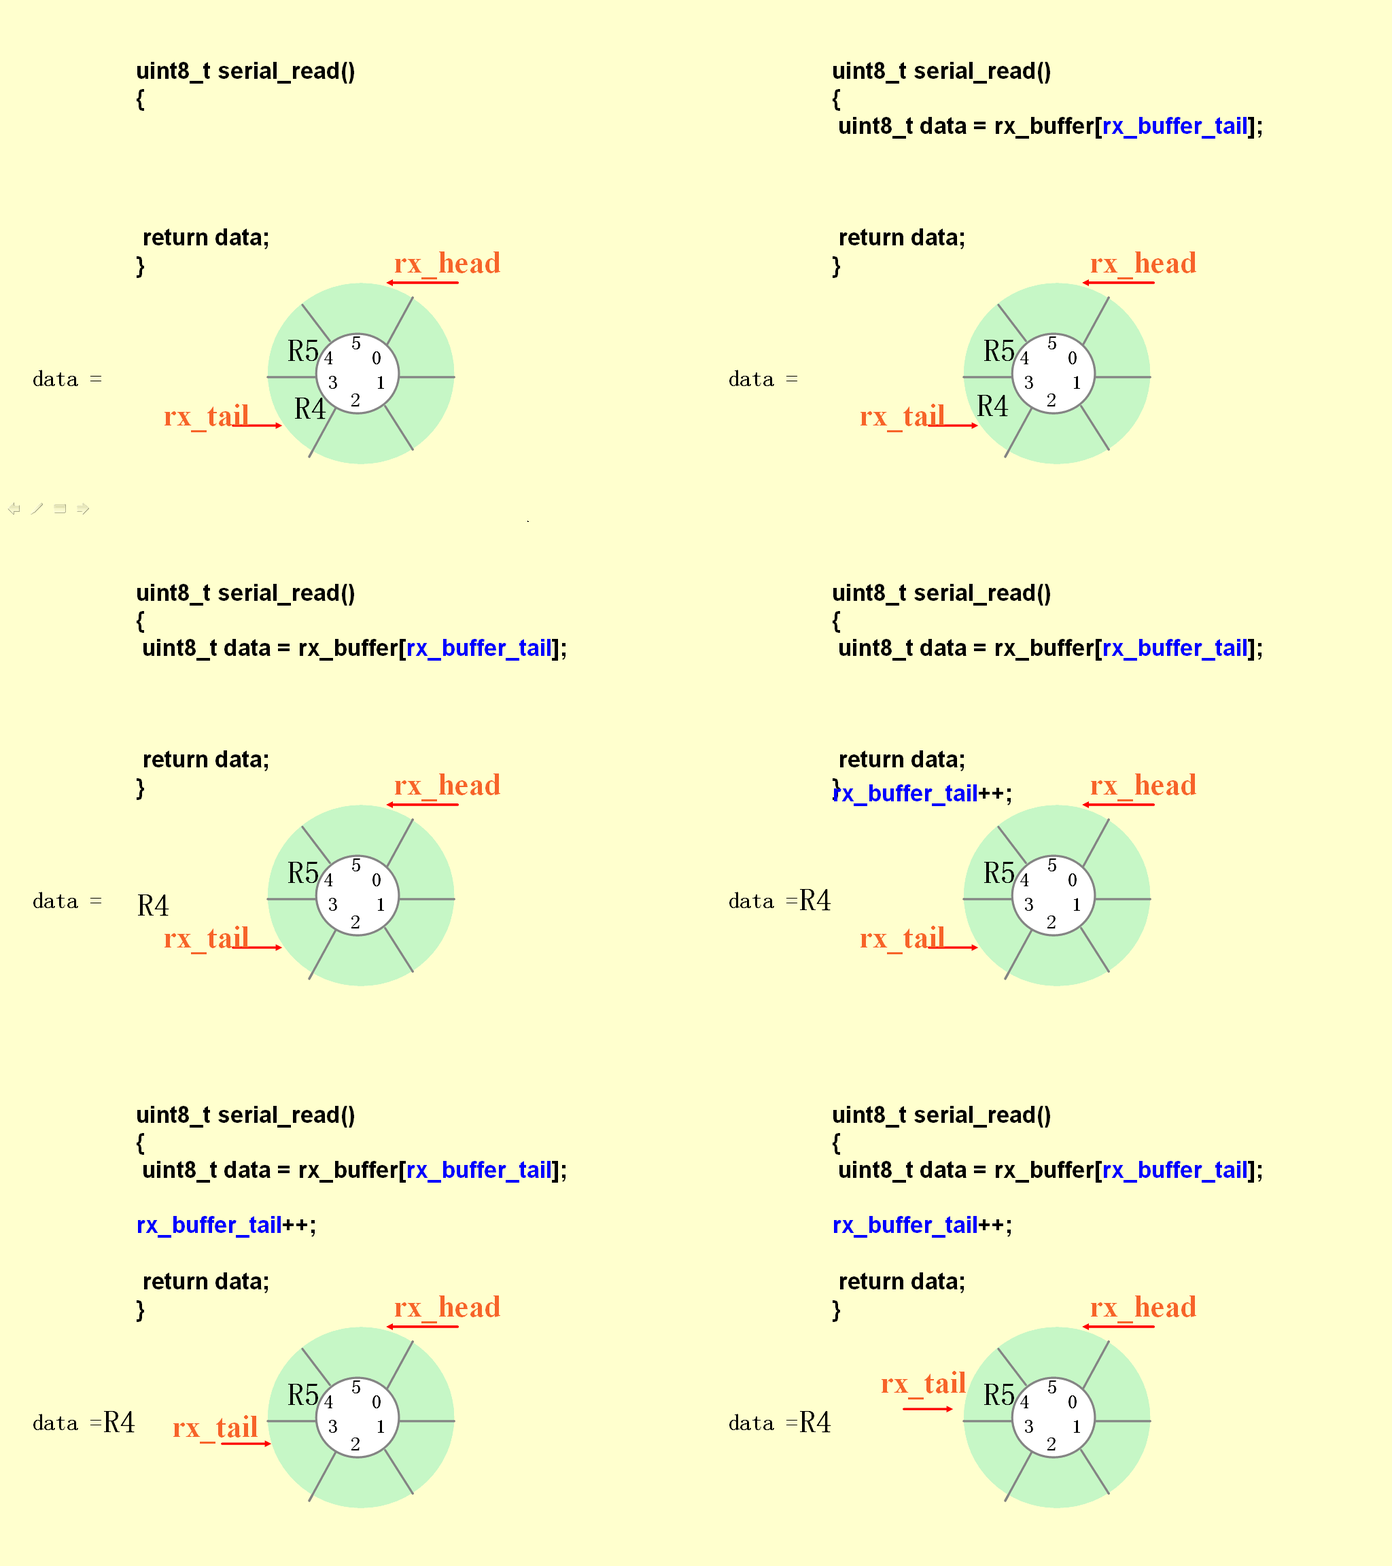
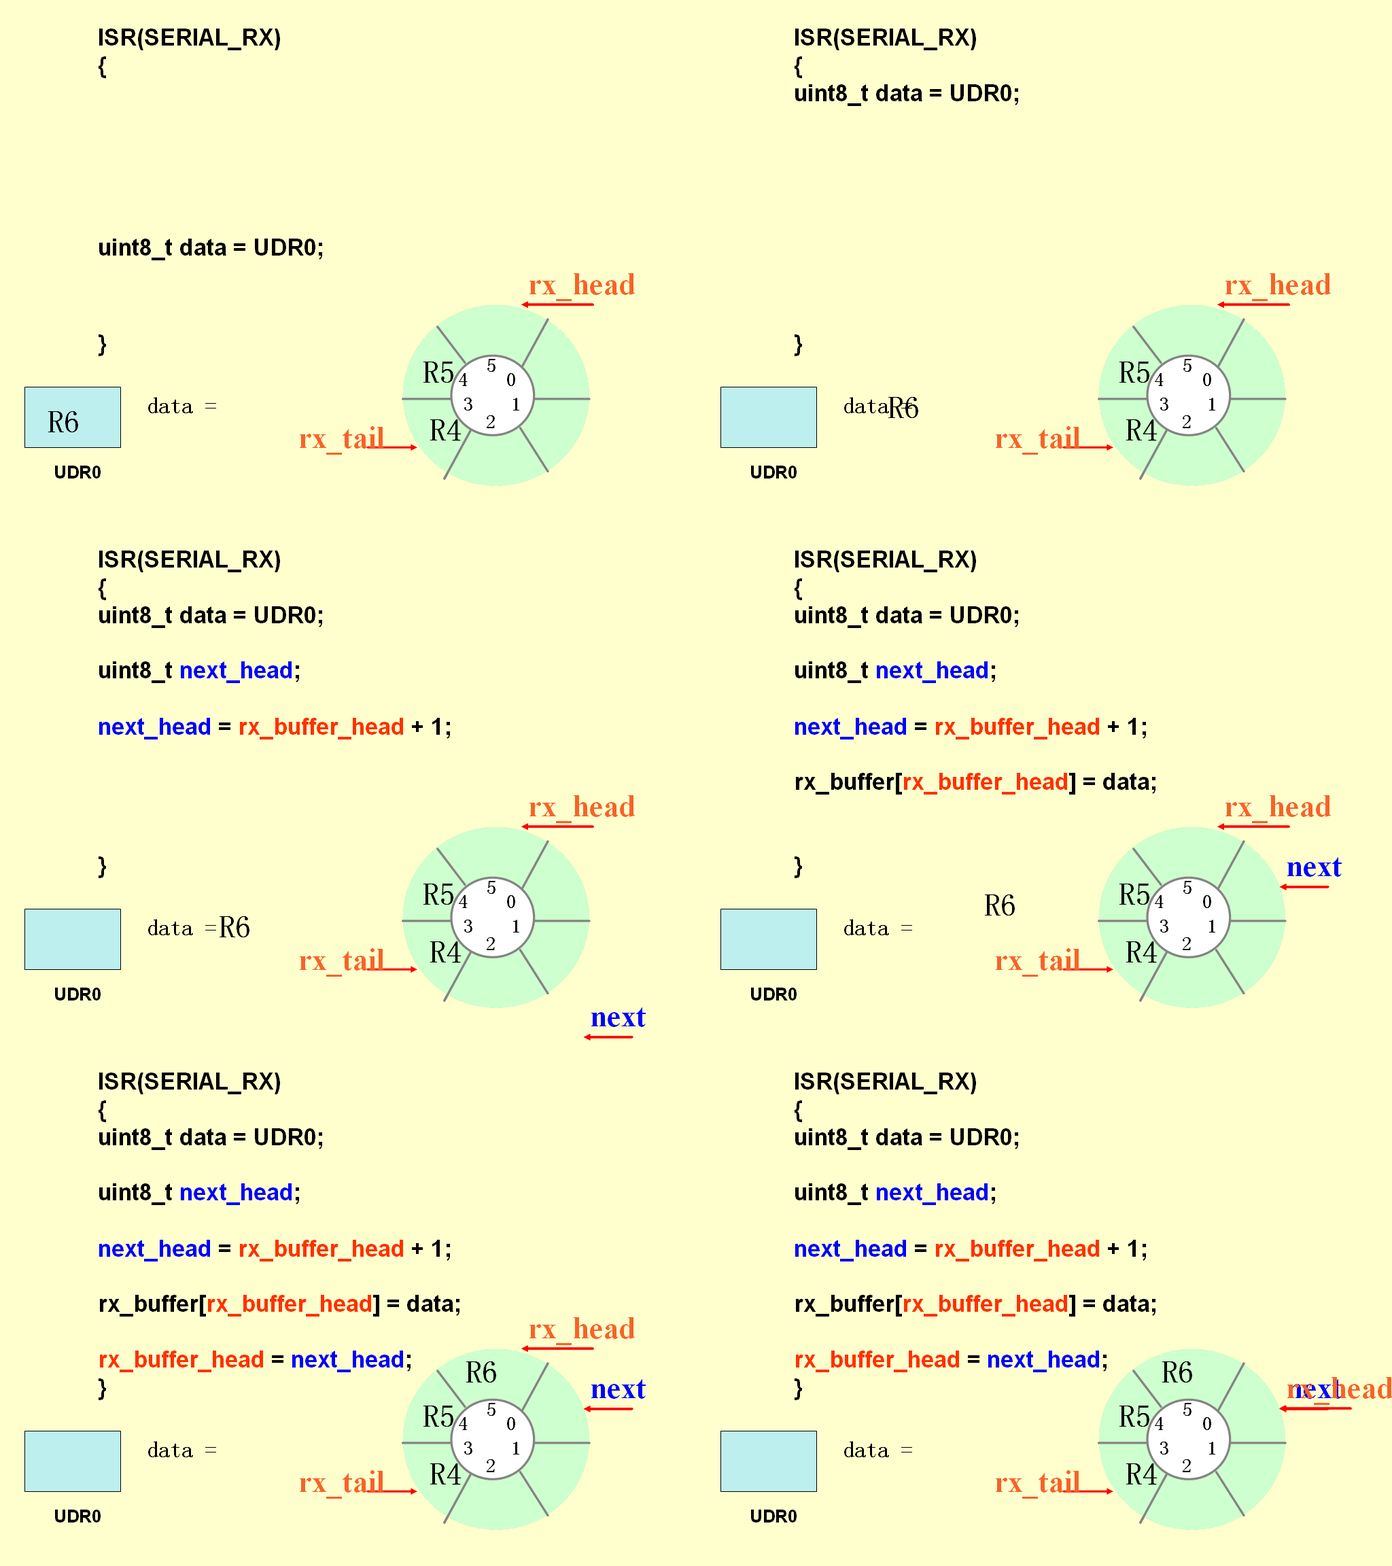
RX 隊列
--------------------------------------------------------------
******************************
config.h 上
幾乎全是注釋的文件
******************************
This file contains compile-time configurations for Grbl's internal system.
For the most part,users will not need to directly modify these, but they are here for specific needs, i.e. performance tuning or adjusting to non-typical machines.
說明了這個文件的用途。
1、 Default settings. Used when resetting EEPROM. Change to desired name in defaults.h
#define DEFAULTS_GENERIC
保存在 EEPROM 中的參數,默認值。
2、Serial baud rate
#define BAUD_RATE 9600
3、Default pin mappings. Grbl officially supports the Arduino Uno only. Other processor typesmay exist from user-supplied templates or directly user-defined in pin_map.h
#define PIN_MAP_ARDUINO_UNO
默認端口配置。
4、Define runtime command special characters. These characters are 'picked-off' directly from the serial read data stream and are not passed to the grbl line execution parser.
Select characters that do not and must not exist in the streamed g-code program. ASCII control characters may be used, if they are available per user setup.
Also, extended ASCII codes (>127), which are never in g-code programs, maybe selected for interface programs.
NOTE: If changed, manually update help message in report.c.
#define CMD_STATUS_REPORT '?'
#define CMD_FEED_HOLD '!'
#define CMD_CYCLE_START '~'
#define CMD_RESET 0x18 // ctrl-x
命令符,區別 G CODE,用來控制程序。
5、The temporal resolution of the acceleration management subsystem. Higher number give smoother acceleration but may impact performance.
NOTE: Increasing this parameter will help any resolution related issues, especially with machines requiring very high accelerations and/or very fast feedrates.
In general, this will reduce the error between how the planner plans the motions and how the stepper program actually performs them.
However, at some point, the resolution can be high enough, where the errors related to numerical round-off can be great enough to cause problems and/or it's too fast for the Arduino.
The correct value for this parameter is machine dependent, so it's advised to set this only as high as needed.
Approximate successful values can range from 30L to 100L or more.
#define ACCELERATION_TICKS_PER_SECOND 50L
工作原理還不清楚,作用注釋已經解釋很清楚了。
6、Minimum planner junction speed. Sets the default minimum speed the planner plans for at the end of the buffer and all stops. This should not be much greater than zero and should only be changed if unwanted behavior is observed on a user's machine when running at very slow speeds.
#define MINIMUM_PLANNER_SPEED 0.0 // (mm/min)
不清楚工作機理,看起來很厲害。
7、Minimum stepper rate. Sets the absolute minimum stepper rate in the stepper program and never runs slower than this value, except when sleeping. This parameter overrides the minimum planner speed.
This is primarily used to guarantee that the end of a movement is always reached and not stop to never reach its target. This parameter should always be greater than zero.
#define MINIMUM_STEPS_PER_MINUTE 800 // (steps/min) - Integer value only
8、Time delay increments performed during a dwell. The default value is set at 50ms, which provides a maximum time delay of roughly 55 minutes, more than enough for most any application.
Increasing this delay will increase the maximum dwell time linearly, but also reduces the responsiveness of run-time command executions, like status reports, since these are performed between each dwell time step.
Also, keep in mind that the Arduino delay timer is not very accurate for long delays.
define DWELL_TIME_STEP 50 // Integer (1-255) (milliseconds)
9、If homing is enabled, homing init lock sets Grbl into an alarm state upon power up.
This forces the user to perform the homing cycle (or override the locks) before doing anything else. This is mainly a safety feature to remind the user to home, since position is unknown to Grbl.
#define HOMING_INIT_LOCK // Comment to disable
不理解,用到時再來理解。
10、The homing cycle seek and feed rates will adjust so all axes independently move at the homing seek and feed rates regardless of how many axes are in motion simultaneously.
If disabled, rates are point-to-point rates, as done in normal operation. For example in an XY diagonal motion, the diagonal motion moves at the intended rate, but the individual axes move at 70% speed.
This option just moves them all at 100% speed.
#define HOMING_RATE_ADJUST // Comment to disable
11、Define the homing cycle search patterns with bitmasks. The homing cycle first performs a search to engage the limit switches.
HOMING_SEARCH_CYCLE_x are executed in order starting with suffix 0 and searches the enabled axes in the bitmask.
This allows for users with non-standard cartesian machines, such as a lathe (x then z), to configure the homing cycle behavior to their needs.
Search cycle 0 is required, but cycles 1 and 2 are both optional and may be commented to disable.
After the search cycle, homing then performs a series of locating about the limit switches to hone in on machine zero, followed by a pull-off maneuver. HOMING_LOCATE_CYCLE governs these final moves, and this mask must contain all axes in the search.
NOTE: Later versions may have this installed in settings.
#define HOMING_SEARCH_CYCLE_0 (1<<z_axis) [="" color][="" b]="" first="" move="" z="" to="" clear="" workspace.
#define HOMING_SEARCH_CYCLE_1 ((1<<x_axis)|(1<<y_axis)) [="" color][="" b]="" then="" move="" x,y="" at="" the="" same="" time.
// #define HOMING_SEARCH_CYCLE_2 // Uncomment and add axes mask to enable
#define HOMING_LOCATE_CYCLE ((1<<x_axis)|(1<<y_axis)|(1<<z_axis))[ color][="" b]="" must="" contain="" all="" search="" axes
12、Number of homing cycles performed after when the machine initially jogs to limit switches.
This help in preventing overshoot and should improve repeatability. This value should be one or greater.
#define N_HOMING_LOCATE_CYCLE 2 // Integer (1-128)
13、Number of blocks Grbl executes upon startup.
These blocks are stored in EEPROM, where the size and addresses are defined in settings.h. With the current settings, up to 5 startup blocks may be stored and executed in order.
These startup blocks would typically be used to set the g-code parser state depending on user preferences.
#define N_STARTUP_LINE 2 // Integer (1-5)
******************************************
感覺設置很復雜,大多數都不理解,先混個臉熟。
**********************
config.h 下
advanced users only
**********************
The number of linear motions in the planner buffer to be planned at any give time.
The vast majority of RAM that Grbl uses is based on this buffer size.
Only increase if there is extra available RAM, like when re-compiling for a Teensy or Sanguino. Or decrease if the Arduino begins to crash due to the lack of available RAM or if the CPU is having trouble keeping up with planning new incoming motions as they are executed.
// #define BLOCK_BUFFER_SIZE 18 // Uncomment to override default in planner.h.
默認 是注釋掉的
Line buffer size from the serial input stream to be executed.
Also, governs the size of each of the startup blocks, as they are each stored as a string of this size.
Make sure to account for the available EEPROM at the defined memory address in settings.h and for the number of desired startup blocks.
NOTE: 70 characters is not a problem except for extreme cases, but the line buffer size can be too small and g-code blocks can get truncated.
Officially, the g-code standards support up to 256 characters. In future versions, this default will be increased, when we know how much extra memory space we can re-invest into this.
// #define LINE_BUFFER_SIZE 70 // Uncomment to override default in protocol.h
Serial send and receive buffer size.
The receive buffer is often used as another streaming buffer to store incoming blocks to be processed by Grbl when its ready. Most streaming interfaces will character count and track each block send to each block response.
So, increase the receive buffer if a deeper receive buffer is needed for streaming and avaiable memory allows. The send buffer primarily handles messages in Grbl.
Only increase if large messages are sent and Grbl begins to stall, waiting to send the rest of the message.
// #define RX_BUFFER_SIZE 128 // Uncomment to override defaults in serial.h
// #define TX_BUFFER_SIZE 64
這個已經在 serial.c 中理解過了。
Toggles XON/XOFF software flow control for serial communications.
Not officially supported due to problems involving the Atmega8U2 USB-to-serial chips on current Arduinos.
The firmware on these chips do not support XON/XOFF flow control characters and the intermediate buffer in the chips cause latency and overflow problems with standard terminal programs.
However, using specifically-programmed UI's to manage this latency problem has been confirmed to work.
As well as, older FTDI FT232RL-based Arduinos(Duemilanove) are known to work with standard terminal programs since their firmware correctly manage these XON/XOFF characters.
// #define ENABLE_XONXOFF // Default disabled. Uncomment to enable.
Creates a delay between the direction pin setting and corresponding step pulse by creating another interrupt (Timer2 compare) to manage it.
The main Grbl interrupt (Timer1 compare) sets the direction pins, and does not immediately set the stepper pins, as it would in normal operation.
The Timer2 compare fires next to set the stepper pins after the step pulse delay time, and Timer2 overflow will complete the step pulse, except now delayed by the step pulse time plus the step pulse delay. (Thanks langwadt for the idea!)
This is an experimental feature that should only be used if your setup requires a longer delay between direction and step pin settings (some opto coupler based drivers), as it may adversely effect Grbl's high-end performance (>10kHz).
However, we suggest to first try our direction delay hack/solution posted in the Wiki involving inverting the stepper pin mask.
NOTE: Uncomment to enable. The recommended delay must be > 3us and the total step pulse time, which includes the Grbl settings pulse microseconds, must not exceed 127us.
Reported successful values for certain setups have ranged from 10 to 20us.
// #define STEP_PULSE_DELAY 10 // Step pulse delay in microseconds. Default disabled.
******************************
感覺 和 電機 加速度算法 之類的有關系。還沒有找到適合的資料 來 幫助理解。
------------------------------------------------------------------------------
**********************
defaults.h 上
默認參數設置
**********************
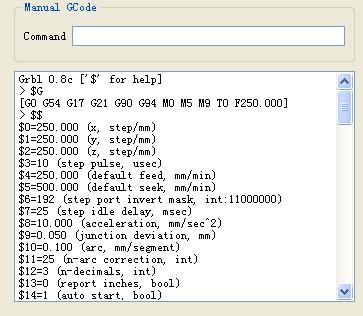
通訊一建立,這些參數就會顯示出來
幸好有幫助文檔,https://github.com/grbl/grbl/wiki/Configuring-Grbl-v0.8
The defaults.h file serves as a central default settings file for different machine types, from DIY CNC mills to CNC conversions of off-the-shelf machines.
The settings here are supplied by users, so your results may vary.
However, this should give you a good starting point as you get to know your machine and tweak the settings for your our nefarious needs.
#ifdef DEFAULTS_GENERIC
參數設置
#endif
只理解默認的,
參數設置0、1、2
#define DEFAULT_X_STEPS_PER_MM 250.0
Grbl needs to know how far each step will take the tool in reality. To calculate steps/mm for an axis of your machine you need to know:
The mm per revolution of the lead screw
The full steps per revolution of your steppers (typically 200)
The microsteps per step of your controller (typically 1, 2, 4, 8, or 16). Tip: Using high microstep values (e.g 16) can reduce your stepper motor torque, so use the lowest that gives you the desired axes resolution and comfortable running properties.
The steps/mm can then be calculated like this: steps_per_mm = (steps_per_revolution*microsteps)/mm_per_rev
Compute this value for every axis and write these settings to Grbl.
計算方法實例,
Motor 200 steps/rev
Driver 2 microsteps/step
Screw 1.25 rev/mm
The resolution is: 2 microsteps/step * 200 step/rev * 1/1.25 rev/mm = 320 microstep/mm.
同理,
#define DEFAULT_Y_STEPS_PER_MM 250.0
#define DEFAULT_Z_STEPS_PER_MM 250.0
應該絲桿尺寸不一致,這個數字基本更改。
*************************************
參數設置3
#define DEFAULT_STEP_PULSE_MICROSECONDS 10
Step pulse, microseconds
Stepper drivers are rated for a certain minimum step pulse length. Check the data sheet or just try some numbers. You want as short pulses as the stepper drivers can reliably recognize. If the pulses are too long you might run into trouble running the system at high feed rates. Generally something between 5 and 50 microseconds works fine.
*************************************
參數設置4、5
#define DEFAULT_RAPID_FEEDRATE 500.0 // mm/min
#define DEFAULT_FEEDRATE 250.0
Default feed and seek rates, mm/min
This setting sets the default seek(G0) and feed rates(G1,G2,G3) after Grbl powers on and initializes. The seek rate (aka rapids) is used for moving from point A to point B as quickly as possible, usually for traversing into position. The seek rate should be set at the maximum speed your machine can go in any axes movement. The default feed rate usually does not enter into the picture as feed rates will generally be specified in the g-code program, but if not, this default feed rate will be used.
*************************************
參數設置6
#define DEFAULT_JUNCTION_DEVIATION 0.05 // mm
Step port invert mask, int:binary
Some cnc-stepper controllers needs its high-low inputs inverted for both direction and steps.
Signal lines are normally held high or low to signal direction or held high and goes low for a couple of microseconds to signal a step event. To achieve this, Grbl can invert the output bits to accomodate particular needs.
The invert mask value is a byte that is xored with the step and direction data before it is sent down the stepping port. That way you can use this both to invert step pulses or to invert one or more of the directions of the axes.
The bits in this byte corresponds to the pins assigned to stepping in config.h. Note that bits 0 and 1 are not used for inversion. Per default bits are assigned like this:
ARDUINO 代碼復制打印
- #define X_STEP_BIT 2
- #define Y_STEP_BIT 3
- #define Z_STEP_BIT 4
- #define X_DIRECTION_BIT 5
- #define Y_DIRECTION_BIT 6
- #define Z_DIRECTION_BIT 7
If you wanted to invert the X and Y direction in this setup you would calculate a value by bitshifting like this (in your favorite calculating environment):
> (1<<x_direction_bit)|(1<<y_direction_bit)
Which is equal to 96, so issuing this command would invert them:
$6=96
Now when you view the current settings, you should now see this in your invert mask line with the binary representation of the number (bits 5 and 6 should now show a 1 to indicate inversion.)
$6=96 (step port invert mask. int:1100000)
*****************************************
參數設置7
#define DEFAULT_STEPPER_IDLE_LOCK_TIME 25 // msec (0-255)
Step idle delay, msec
Every time your steppers complete a motion and come to a stop, Grbl will disable the steppers by default.
The stepper idle lock time is the time length Grbl will keep the steppers locked before disabling.
Depending on the system, you can set this to zero and disable it. On others, you may need 25-50 milliseconds to make sure your axes come to complete stop before disabling. (My machine tends to drift just slightly if I don't have this enabled.) OR, you can always keep your axes enabled at all times by setting this value to the maximum 255 milliseconds. Again, just to repeat, you can keep all axes always enabled by setting $7=255.
*******************************************
參數設置8
#define DEFAULT_ACCELERATION (10.0*60*60) // 10 mm/min^2
Acceleration, mm/sec^2
This is the acceleration in mm/second/second.
You don’t have to understand what that means, suffice it to say that a lower value gives smooooother acceleration while a higher value yields tighter moves and reach the desired feedrates much quicker.
In technical terms, this is the point to point acceleration of your machine, independent of axes. Set this acceleration value as high as your most limiting axes can let you without losing ANY steps.
Usually you'd like to give yourself a little buffer, because if you lose steps, Grbl has no idea this has happened (steppers are open-loop control) and will keep going.
**********************************************
參數設置9
#define DEFAULT_JUNCTION_DEVIATION 0.05 // mm
Junction deviation, mm
Cornering junction deviation is used by the acceleration manager to determine how fast it can move through a path.
The math is a bit complicated but in general, higher values gives generally faster, possibly jerkier motion. Lower values makes the acceleration manager more careful and will lead to careful and slower cornering.
So if you run into problems where your machine tries to take a corner too fast, decrease this value to make it slow down.
If you want your machine to move faster through junctions, increase this value to speed it up.
For technical people, hit this link to read about Grbl's cornering algorithm, which accounts for both velocity and junction angle with a very simple, efficient, and robust method.
*********************************************
***********************
defaults.h 下
************************
參數設置10
#define DEFAULT_MM_PER_ARC_SEGMENT 0.1
Arc, mm/segment
Grbl renders circles and arcs by subdividing them into teeny tiny lines. You will probably never need to adjust this value – but if you find that your circles are too crude (really? one tenth of a millimeter is not precise enough for you? Are you in nanotech?) you may adjust this. Lower values gives higher precision but may lead to performance issues.
***************************
參數設置11
#define DEFAULT_N_ARC_CORRECTION 25
N-arc correction, int
This is an advanced setting that shouldn't be changed unless there are circumstances that you need to. To make G02/03 arcs possible in Grbl, Grbl approximates the location of the next arc segment by a small angle approximation. N-arc correction is the number of approximate arc segments performed before Grbl computes an exact arc segment to correct for the approximation error drift. Computing these exact locations are computationally expensive, but there are some extreme cases where the small angle approximations can introduce enough error to be noticeable, like very very small arcs with a large arc segment length. Change this setting only if find strange problems with arcs, but it's not recommended to go below 3 because this may lead to buffer starvation, where the axes slow down and hiccup. But, results can vary.
****************************
參數設置12
#define DEFAULT_DECIMAL_PLACES 3
N-decimal, int
Set how many decimal places all of the floating point values Grbl reports. Not much more complicated than that.
****************************
參數設置13
#define DEFAULT_REPORT_INCHES 0 // false
Report inches, bool
Grbl v0.8 has a real-time positioning reporting feature to provide a user feedback on where the machine is exactly at that time. By default it is set to report in mm, but by sending a $13=1 command, you send this boolean flag to true and the status reporting feature will now report in inches. $13=0 to set back to mm.
名字 是 report inches,真 時,單位 inch,假時 單位 mm。
******************************
參數設置14
#define DEFAULT_AUTO_START 1 // true
Auto start, bool
In a more professional CNC environment, pros start a job by loading up their program and then pressing the 'cycle start' button on their machine. It begins the job. Grbl does the same thing, but not by default. As a learning tool, we 'auto-cycle start' any g-code command that user sends to Grbl, for just jogging the machine to see if move in the direction they think it should go, or just seeing with what their machine can do. This makes it easier to load up your machine with Grbl and pick up on how it works, rather than having to diligently hit 'cycle start' anytime you want to move any your axes. Once you learn your machine and get a good handle on g-code, you can disable the 'auto cycle-start' feature by sending Grbl $14=0 command. (May need a soft-reset or power cycle to load the change.)
Another way of saying that might be:
If $14=0 then some gcode commands like Xn, Yn etc. won't happen when you enter them at a serial terminal. If $14=1 then the gcode motion commands will happen.
Apparently big cnc's won't execute gcode until the operator presses a 'cycle start' button. The gcode commands were received but queued and awaiting the 'cycle start' button. Makes sense yes? When $14=0 then that's how grbl acts too. You need the button! (in which case attach the feed-hold button too!).
When $14=1 then the grbl software automatically presses a software version of the 'cycle start' for you each time you 'enter' a gcode command line via a serial terminal. This is done to make it more convenient for you to enter commands and see something happen without having to push the button.


*********************************
參數設置15
#define DEFAULT_INVERT_ST_ENABLE 0 // false
Invert step enable, bool
By default, the stepper enable pin is high to disable and low to enable. If your setup needs the opposite, just invert the stepper enable pin by typing $15=1. Disable with $15=0. (May need a power cycle to load the change.)
**********************************
參數設置16
#define DEFAULT_HARD_LIMIT_ENABLE 0 // false
Hard limits, bool
Hard limit switches are a safety feature to help prevent your machine from traveling way too far off the ends of travel and crashing or breaking something expensive. Basically you wire up some switches (mechanical or optical) near the end of travel of each axes, or where ever you feel like there might be trouble if your program moves too far to where it shouldn't. When the switch triggers, it will immediately stop all motion, shutdown the coolant and spindle (if connected), and go into alarm mode, which forces you to check your machine and reset everything.
To use hard limits with Grbl, the limit pins are held high with an internal pull-up resistor, so all you have to do is wire in a normally-open switch with the pin and ground and enable hard limits with $16=1. That's it. (Disable with $16=0) If you want a limit for both ends of travel of one axes, just wire in two switches in parallel with the pin and ground, so if either one of them trips, it triggers the hard limit.
Just know, that a hard limit event is considered to be critical event, where steppers immediately stop and will have likely lost steps. Grbl doesn't have any feedback on position, so it can't guarantee it has any idea where it is. So, if a hard limit is triggered, Grbl will go into an infinite loop ALARM mode, giving you a chance to check your machine and forcing you to reset Grbl. Remember it's a purely a safety feature.
If you have issues with the hard limit switch constantly triggering after you reset, a soft-reset will reset Grbl into an alarm state, where you can access the settings and Grbl commands, but all g-codes and startup blocks will be locked out. So you can disable the hard limits setting and then $X unlock the alarm. Or, you can wire in a normally-closed switch in series with ground to all the limit switches to disconnect the switches temporarily so you can have Grbl move your axes off the switches.
******************************
參數設置17
#define DEFAULT_HOMING_ENABLE 0 // false
Homing cycle, bool
Ahh, homing. Something that has been sorely needed in Grbl for a long time. It's now fully supported in v0.8. For those just initiated into CNC, the homing cycle is used to accurately and precisely locate position zero on a machine (aka machine zero) everytime you startup your Grbl between sessions. In other words, you know exactly where you are at any given time, every time. Say you start machining something or are about to start the next step in a job and the power goes out, you re-start Grbl and Grbl has no idea where it is. You're left with the task of figuring out where you are. If you have homing, you always have the machine zero reference point to locate from, so all you have to do is run the homing cycle and resume where you left off.
To set up the homing cycle for Grbl, you need to have limit switches in a fixed position that won't get bumped or moved, or else your reference point gets messed up. Usually they are setup in the farthest point in +x, +y, +z of each axes. Wire your limit switches in with the limit pins and ground, just like with the hard limits, and enable homing. If you're curious, you can use your limit switches for both hard limits AND homing. They play nice with each other.
By default, Grbl's homing cycle moves the Z-axis positive first to clear the workspace and then moves both the X and Y-axes at the same time in the positive direction. To set up how your homing cycle behaves, there are more Grbl settings down the page describing what they do (and compile-time options as well.)
Also, one more thing to note, when homing is enabled. Grbl will lock out all g-code commands until you perform a homing cycle. Meaning no axes motions, unless the lock is disabled ($X) but more on that later. Most, if not all CNC controllers, do something similar, as it mostly a safety feature to help users from making positioning mistake, which is very easy to do and be saddening when a mistake ruins a part. If you find this annoying or find any weird bugs, please let us know and we'll try to work on it so everyone is happy. 
NOTE: Check out config.h for more homing options for advanced users. You can disable the homing lockout at startup, configure which axes move first during a homing cycle and in what order, and more.
***********************
參數設置18
#define DEFAULT_HOMING_DIR_MASK 0 // move positive dir
Homing dir invert mask, int:binary
By default, Grbl assumes your homing limit switches are in the positive direction, first moving the z-axis positive, then the x-y axes positive before trying to precisely locate machine zero by going back and forth slowly around the switch. If your machine has a limit switch in the negative direction, the homing direction mask can invert the axes direction. It works just like the invert stepper mask, where all you have to do set the axis direction pins to 1 that you want to invert and that axes will now search for the limit pin in the negative direction.
***************************
參數設置19
#define DEFAULT_HOMING_FEEDRATE 25.0 // mm/min
Homing feed, mm/min
The homing cycle first searches for the limit switches at a higher seek rate, and after it finds them, it moves at a slower feed rate to hone into the precise location of machine zero. Homing feed rate is that slower feed rate. Set this to whatever rate value that provides repeatable and precise machine zero locating.
**************************
參數設置20
#define DEFAULT_HOMING_RAPID_FEEDRATE 250.0 // mm/min
Homing seek, mm/min
Homing seek rate is the homing cycle search rate, or the rate at which it first tries to find the limit switches. Adjust to whatever rate gets to the limit switches in a short enough time without crashing into your limit switches if they come in too fast. This seek rate behaves a little differently than the main stepper driver. Instead of the rate from point to point, it just moves all of the axes at the same individual rate, regardless of how many axes are moving at the same time. So, the XY seek move will seem to move about 41% faster than if you would move it with a G1 command. (You can disable this in config.h if it bothers you. It's there to speed up the homing cycle.)
*******************************
參數設置21
#define DEFAULT_HOMING_DEBOUNCE_DELAY 100 // msec (0-65k)
Homing debounce, ms
Whenever a switch triggers, some of them can have electrical/mechanical noise that actually 'bounce' the signal high and low for a few milliseconds before settling in. To solve this, you need to debounce the signal, either by hardware with some kind of signal conditioner or by software with a short delay to let the signal finish bouncing. Grbl performs a short delay only homing when locating machine zero. Set this delay value to whatever your switch needs to get repeatable homing. In most cases, 5-25 milliseconds is fine.
類似單片機中 常見的 鍵盤 消抖
*******************************
參數設置22
#define DEFAULT_HOMING_PULLOFF 1.0 // mm
Homing pull-off, mm
To play nice with the hard limits feature, where homing can share the same limit switches, the homing cycle will move off the all of the limit switches by this pull-off travel after it completes. In other words, it helps to prevent accidental triggering of the hard limit after a homing cycle.
The homing seek rate setting controls how quickly the pull-off maneuver moves, like a G1 command.
******************************************
總共 22 個參數設置,對我這樣第一次接觸,內容量還是很大的。
------------------------------------------------------------------------------
*******************************
protocol.h
the serial protocol master control unit
*******************************

serial 收到 gcode 后,要通過 protocal 來處理,
****************************
內容1
#include
睡眠模式,難道要省電?
****************************
內容2
#ifndef LINE_BUFFER_SIZE
#define LINE_BUFFER_SIZE 70
#endif
Line buffer size from the serial input stream to be executed.
NOTE: Not a problem except for extreme cases, but the line buffer size can be too small and g-code blocks can get truncated. Officially, the g-code standards support up to 256 characters. In future versions, this will be increased, when we know how much extra memory space we can invest into here or we re-write the g-code parser not to have his buffer.
在 config.h 中 也有定義,不過默認 是 // 的
*****************************
內容3
void protocol_init();
Initialize the serial protocol
放在 這里 的函數 都可以 被 其它文件調用。
******************************
內容4
void protocol_process();
Read command lines from the serial port and execute them as they come in. Blocks until the serial buffer is emptied.
********************************
內容5
uint8_t protocol_execute_line(char *line);
Executes one line of input according to protocol
*******************************
內容6
void protocol_execute_runtime();
Checks and executes a runtime command at various stop points in main program
*********************************
內容7
void protocol_execute_startup();
Execute the startup script lines stored in EEPROM upon initialization
*******************************
函數數量不多,功能明確,下一步理解 .c 文件,理解如何實現。
------------------------------------------------------
************************
protocol.c 上
the serial protocol master control unit
************************
內容1 包含的頭文件
#include
#include
#include "protocol.h"
#include "gcode.h"
#include "serial.h"
#include "print.h"
#include "settings.h"
#include "config.h"
#include "nuts_bolts.h"
#include "stepper.h"
#include "report.h"
#include "motion_control.h"
理解所需的頭文件
和 是標準文件,輸入輸出 和 中斷。
已經理解過的頭文件:protocol.h 是 聲明文件,serial.h 聲明通訊函數,config.h —— compile time configuration
還沒有接觸的頭文件
gcode.h —— rs274/ngc parser
print.h —— Functions for formatting output strings
settings.h —— eeprom configuration handling
nuts_bolts.h —— Header file for shared definitions, variables, and functions
stepper.h —— stepper motor driver: executes motion plans of planner.c using the stepper motors
report.h —— reporting and messaging methods
motion_control.h —— high level interface for issuing motion commands
這些頭文件 被用到時再理解。
*****************************************
內容2 定義靜態變量 數組
static char line[LINE_BUFFER_SIZE];
static uint8_t char_counter;
static uint8_t iscomment;
Line to be executed. Zero-terminated. line[LINE_BUFFER_SIZE],復習一下,
在 protocol.h 中
#ifndef LINE_BUFFER_SIZE
#define LINE_BUFFER_SIZE 70
#endif
Last character counter in line variable. char_counter
Comment/block delete flag for processor to ignore comment characters. iscomment
*****************************************
內容4 靜態 函數
static void protocol_reset_line_buffer()
{
char_counter = 0; // Reset line input
iscomment = false;
}
為什么 靜態? http://bbs.csdn.net/topics/350238100 7樓
定義靜態函數的好處:
<1> 其他文件中可以定義相同名字的函數,不會發生沖突
<2> 靜態函數不能被其他文件所用。
同樣也可以理解 為什么 char_counter 靜態變量
由于static變量的以上特性,可實現一些特定功能。
1. 統計次數功能
聲明函數的一個局部變量,并設為static類型,作為一個計數器,這樣函數每次被調用的時候就可以進行計數。這是統計函數被調用次數的最好的辦法,因為這個變量是和函數息息相關的,而函數可能在多個不同的地方被調用,所以從調用者的角度來統計比較困難。
************************************************
內容 4 初始化 protocol
void protocol_init()
{
復位();
歡迎信息();
設置端口();
}
利用偽代碼理解結構,然后細化,
1、復位();
protocol_reset_line_buffer();
直接調用剛才定義的靜態函數就可以了。
2、歡迎信息();
report_init_message();
就是輸出歡迎的信息,聲明在 report.h 中。非常簡單。
3、設置端口();
PINOUT_DDR &= ~(PINOUT_MASK);
PINOUT_PORT |= PINOUT_MASK;
PINOUT_PCMSK |= PINOUT_MASK;
PCICR |= (1 << PINOUT_INT);
首先 需要看一下定義,
#define PINOUT_DDR DDRC
#define PINOUT_PORT PORTC
#define PINOUT_PCMSK PCMSK1
#define PINOUT_MASK ((1<<pin_reset)|(1<<pin_feed_hold)|(1<<pin_cycle_start))
#define PINOUT_INT PCIE1
#define PIN_RESET 0
#define PIN_FEED_HOLD 1
#define PIN_CYCLE_START 2
上面的定義 位于 pin_map.h 中,而被 nuts_bolts.h 引用,再被該文件引用
這里可能需要花些精力來確認 哪個是哪個端口?
首先 看具體定義端口的
#define PIN_RESET 0 // Uno Analog Pin 0
#define PIN_FEED_HOLD 1 // Uno Analog Pin 1
#define PIN_CYCLE_START 2 // Uno Analog Pin 2
然后,看一張總圖,
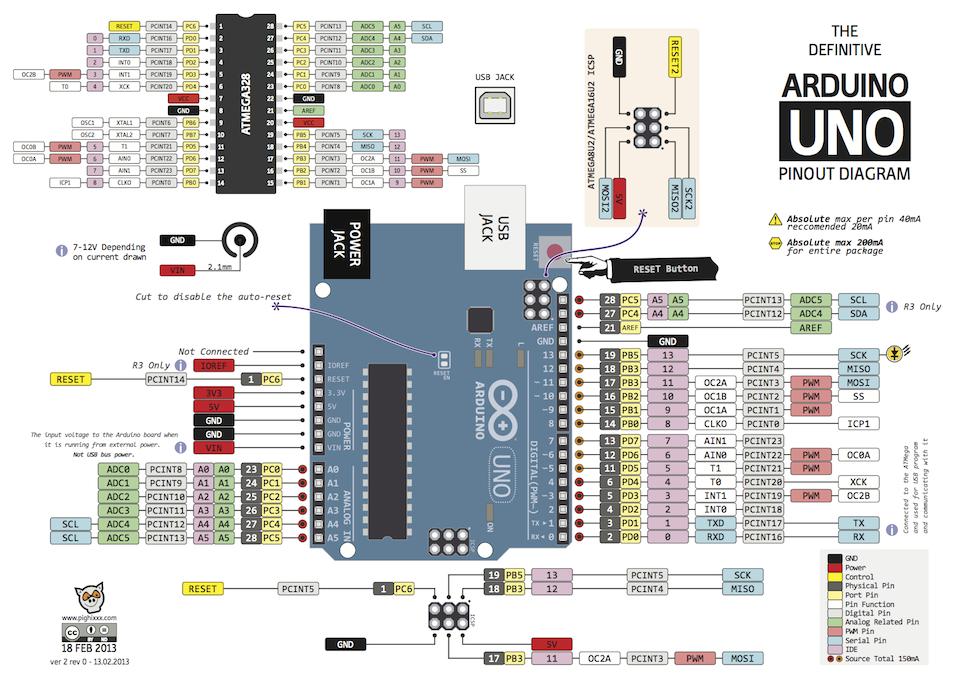
然后,具體 到 上面 三個端口
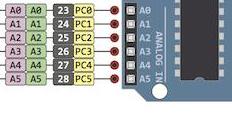
然后,看
#define PINOUT_MASK ((1<<pin_reset)|(1<<pin_feed_hold)|(1<<pin_cycle_start))
意思 就是 arduino上 A0 A1 A2 端口取1。(即 AVR PC0 PC1 PC2 端口 取1)
再來理解AVR中DDRC、PORTC什么意思?
http://zhidao.baidu.com/link?url ... SrQj_v1w1OLQYAnoMJq
AVR單片機的IO是3態門DDRC是C口的方向寄存器,PORTC是C口的數據寄存器,
DDRC為0時,C口為輸入,IO的高低從PORTC可以讀出
DDRC為1時,c為輸出,輸出高低有PORTC控制。
然后,再理解中斷
PCMSK1 為引腳變化屏蔽寄存器 即決定某一I/O引腳變化中斷是否使能。
再回到
PINOUT_DDR &= ~(PINOUT_MASK);
Set as input pins. 對 PINOUT_MASK 取反,就是 arduino上 A0 A1 A2 端口取0。
PINOUT_PORT |= PINOUT_MASK;
Enable internal pull-up resistors. Normal high operation.
PINOUT_PCMSK |= PINOUT_MASK;
Enable specific pins of the Pin Change Interrupt. A0 A1 A2 端口可以中斷。
PCICR |= (1 << PINOUT_INT);
Enable Pin Change Interrupt
這里需要 理解 AVR 中斷機制。暫時理解為 設置哪些引腳可以中斷。
***********************************************
可能還需要 找些 AVR 中斷方面的資料。
***************************
protocol.c 中
****************************
內容5
Executes user startup script, if stored.
void protocol_execute_startup()
{
uint8_t n;
for (n=0; n < N_STARTUP_LINE; n++) {
內容5A();
}
}
復習,
N_STARTUP_LINE 定義 在 config.h 中, #define N_STARTUP_LINE 2
These startup blocks would typically be used to set the g-code parser state depending on user preferences.
blocks :程序塊?
內容5A();
if (!(settings_read_startup_line(n, line))) {
report_status_message(STATUS_SETTING_READ_FAIL);
} else {
if (line[0] != 0) {
printString(line); // Echo startup line to indicate execution.
report_status_message(gc_execute_line(line));
}
}
其中,settings_read_startup_line 函數, 定義在 setting.c 文件中,
Reads startup line from EEPROM. Updated pointed line string data.
沒有成功,返回 false
report_status_messages 函數 根據名字 就理解意思。
在 protocol.c 文件中,static char line[LINE_BUFFER_SIZE]; // Line to be executed. Zero-terminated.
只要不是零,就執行,
printString 函數 定義在print.c 中,串口寫入
gc_execute_line 函數 定義在 gcode.c 中,執行命令
**************************************
內容6
Pin change interrupt for pin-out commands
ISR(PINOUT_INT_vect)
{
// Enter only if any pinout pin is actively low.
內容6A();
}
首先, #define PINOUT_INT_vect PCINT1_vect
這里要再 學習 一下 AVR 的中斷,

PC0 through PC6 trigger PCINT1.
we’ll need to tell the AVR which pins we’d like for it to watch specifically.
This is done through the pin mask, which is just a normal 8-bit byte where the corresponding bit is set for each pin we’d like to be able to trigger the interrupt.
映射端口已經理解過,arduino上 A0 A1 A2 端口。(即 AVR上 PC0 PC1 PC2 端口)
內容 6A();
Enter only if any pinout pin is actively low.
if ((PINOUT_PIN & PINOUT_MASK) ^ PINOUT_MASK) {
內容6B();
}
判斷條件感覺有點復雜,PINOUT_PIN 先和 PINOUT_MASK 按位與,然后再 按位 異或。
只有 PINOUT_PIN 是 低電平,才能為真
然后,
內容6B();
if (bit_isfalse(PINOUT_PIN,bit(PIN_RESET))) {
mc_reset();
} else if (bit_isfalse(PINOUT_PIN,bit(PIN_FEED_HOLD))) {
sys.execute |= EXEC_FEED_HOLD;
} else if (bit_isfalse(PINOUT_PIN,bit(PIN_CYCLE_START))) {
sys.execute |= EXEC_CYCLE_START;
}
首先,
bit_isfalse 是 個宏,定義在 nuts_bolts.h 中,
#define bit_isfalse(x,mask) ((x & mask) == 0)
mc_reset 定義在 motion_control.c 中,system reset。
sys 一個復雜的結構體,
// Define global system variables
typedef struct {
uint8_t abort; // System abort flag. Forces exit back to main loop for reset.
uint8_t state; // Tracks the current state of Grbl.
volatile uint8_t execute; // Global system runtime executor bitflag variable. See EXEC bitmasks.
int32_t position[N_AXIS]; // Real-time machine (aka home) position vector in steps.
// NOTE: This may need to be a volatile variable, if problems arise.
uint8_t auto_start; // Planner auto-start flag. Toggled off during feed hold. Defaulted by settings.
} system_t;
--------------------------------------
***********************
protocol.c 下1
***********************
#define EXEC_STATUS_REPORT bit(0) // bitmask 00000001
#define EXEC_CYCLE_START bit(1) // bitmask 00000010
#define EXEC_CYCLE_STOP bit(2) // bitmask 00000100
#define EXEC_FEED_HOLD bit(3) // bitmask 00001000
#define EXEC_RESET bit(4) // bitmask 00010000
#define EXEC_ALARM bit(5) // bitmask 00100000
#define EXEC_CRIT_EVENT bit(6) // bitmask 01000000
Define system executor bit map. Used internally by runtime protocol as runtime command flags, which notifies the main program to execute the specified runtime command asynchronously.
NOTE: The system executor uses an unsigned 8-bit volatile variable (8 flag limit.)
The default flags are always false, so the runtime protocol only needs to check for a non-zero value to know when there is a runtime command to execute.
內容7 ();
Executes run-time commands, when required.
This is called from various check points in the main program, primarily where there may be a while loop waiting for a buffer to clear space or any point where the execution time from the last check point may be more than a fraction of a second.
This is a way to execute runtime commands asynchronously (aka multitasking) with grbl's g-code parsing and planning functions. This function also serves as an interface for the interrupts to set the system runtime flags, where only the main program handles them, removing the need to define more computationally-expensive volatile variables. This also provides a controlled way to execute certain tasks without having two or more instances of the same task, such as the planner recalculating the buffer upon a feedhold or override.
NOTE: The sys.execute variable flags are set by any process, step or serial interrupts, pinouts, limit switches, or the main program.
void protocol_execute_runtime()
{
if (sys.execute) { // Enter only if any bit flag is true
uint8_t rt_exec = sys.execute; // Avoid calling volatile multiple times
內容7A();
}
}
}
System alarm. Everything has shutdown by something that has gone severely wrong.
Report the source of the error to the user. If critical, Grbl disables by entering an infinite loop until system reset/abort.
內容7A();
內容7B();
內容7C();
內容7D();
內容7E();
內容7F();
內容7G();
內容7B();
Critical event. Only hard limit qualifies. Update this as new critical events surface.
if (rt_exec & (EXEC_ALARM | EXEC_CRIT_EVENT)) {
sys.state = STATE_ALARM; // Set system alarm state
if (rt_exec & EXEC_CRIT_EVENT) {
report_alarm_message(ALARM_HARD_LIMIT);
report_feedback_message(MESSAGE_CRITICAL_EVENT);
bit_false(sys.execute,EXEC_RESET); // Disable any existing reset
} else {
report_alarm_message(ALARM_ABORT_CYCLE);
}
bit_false(sys.execute,(EXEC_ALARM | EXEC_CRIT_EVENT));
}
內容7C();
Execute system abort.
if (rt_exec & EXEC_RESET) {
sys.abort = true; // Only place this is set true.
return; // Nothing else to do but exit.
}
內容7D();
Execute and serial print status
if (rt_exec & EXEC_STATUS_REPORT) {
report_realtime_status();
bit_false(sys.execute,EXEC_STATUS_REPORT);
}
內容7E();
Initiate stepper feed hold
if (rt_exec & EXEC_FEED_HOLD) {
st_feed_hold(); // Initiate feed hold.
bit_false(sys.execute,EXEC_FEED_HOLD);
}
內容7F();
Reinitializes the stepper module running state and, if a feed hold, re-plans the buffer.
NOTE: EXEC_CYCLE_STOP is set by the stepper subsystem when a cycle or feed hold completes.
if (rt_exec & EXEC_CYCLE_STOP) {
st_cycle_reinitialize();
bit_false(sys.execute,EXEC_CYCLE_STOP);
}
內容7G();
if (rt_exec & EXEC_CYCLE_START) {
st_cycle_start(); // Issue cycle start command to stepper subsystem
if (bit_istrue(settings.flags,BITFLAG_AUTO_START)) {
sys.auto_start = true; // Re-enable auto start after feed hold.
}
bit_false(sys.execute,EXEC_CYCLE_START);
}
信息量太大,先整理,以后慢慢看。
*********************************
內容8
Directs and executes one line of formatted input from protocol_process.
While mostly incoming streaming g-code blocks, this also executes Grbl internal commands, such as settings, initiating the homing cycle, and toggling switch states.
This differs from the runtime command module by being susceptible to when Grbl is ready to execute the next line during a cycle, so for switches like block delete, the switch only effects the lines that are processed afterward, not necessarily real-time during a cycle, since there are motions already stored in the buffer.
However, this 'lag' should not be an issue, since these commands are not typically used during a cycle.
uint8_t protocol_execute_line(char *line)
{
// Grbl internal command and parameter lines are of the form '$4=374.3' or '$' for help
if(line[0] == '$') {
uint8_t char_counter = 1;
uint8_t helper_var = 0; // Helper variable
float parameter, value;
switch( line[char_counter] ) {
內容8A();
}
return(STATUS_OK); // If '$' command makes it to here, then everything's ok.
} else {
return(gc_execute_line(line)); // Everything else is gcode
}
}
內容8A();
case 0 : 內容8B();
case '$': 內容8C();
case '#' : 內容8D();
case 'G' : 內容8E();
case 'C' : 內容8F();
case 'X' : 內容8G();
case 'H' : 內容8H();
case 'N' : 內容8I();
default : 內容8J();
內容8B();
report_grbl_help(); break;
內容8C();
Prints Grbl settings $
if ( line[++char_counter] != 0 )
{ return(STATUS_UNSUPPORTED_STATEMENT); }
else
{ report_grbl_settings(); }
break;
內容8D();
Print gcode parameters #
if ( line[++char_counter] != 0 )
{ return(STATUS_UNSUPPORTED_STATEMENT); }
else
{ report_gcode_parameters(); }
break;
內容8E();
Prints gcode parser state G
if ( line[++char_counter] != 0 )
{ return(STATUS_UNSUPPORTED_STATEMENT); }
else
{ report_gcode_modes(); }
break;
內容8F();
Set check g-code mode C
if ( line[++char_counter] != 0 )
{ return(STATUS_UNSUPPORTED_STATEMENT); }
if ( sys.state == STATE_CHECK_MODE ) {
mc_reset();
report_feedback_message(MESSAGE_DISABLED);
} else {
if (sys.state)
{ return(STATUS_IDLE_ERROR); }
sys.state = STATE_CHECK_MODE;
report_feedback_message(MESSAGE_ENABLED);
}
break;
Perform reset when toggling off. Check g-code mode should only work if Grbl is idle and ready, regardless of alarm locks.
This is mainly to keep things simple and consistent.
內容8G();
Disable alarm lock X
if ( line[++char_counter] != 0 )
{ return(STATUS_UNSUPPORTED_STATEMENT); }
if (sys.state == STATE_ALARM) {
report_feedback_message(MESSAGE_ALARM_UNLOCK);
sys.state = STATE_IDLE;
// Don't run startup script. Prevents stored moves in startup from causing accidents.
}
break;
內容8H();
Perform homing cycle H
if (bit_istrue(settings.flags,BITFLAG_HOMING_ENABLE)) {
// Only perform homing if Grbl is idle or lost.
if ( sys.state==STATE_IDLE || sys.state==STATE_ALARM ) {
mc_go_home();
if (!sys.abort)
{ protocol_execute_startup(); } // Execute startup scripts after successful homing.
} else
{ return(STATUS_IDLE_ERROR); }
} else
{ return(STATUS_SETTING_DISABLED); }
break;
內容8I();
Startup lines. N
if ( line[++char_counter] == 0 ) { // Print startup lines
for (helper_var=0; helper_var < N_STARTUP_LINE; helper_var++) {
if (!(settings_read_startup_line(helper_var, line))) {
report_status_message(STATUS_SETTING_READ_FAIL);
} else {
report_startup_line(helper_var,line);
}
}
break;
} else { // Store startup line
helper_var = true; // Set helper_var to flag storing method.
// No break. Continues into default: to read remaining command characters.
}
內容8J();
Storing setting methods
if(!read_float(line, &char_counter, ¶meter))
{ return(STATUS_BAD_NUMBER_FORMAT); }
if(line[char_counter++] != '=')
{ return(STATUS_UNSUPPORTED_STATEMENT); }
if (helper_var) { // Store startup line
// Prepare sending gcode block to gcode parser by shifting all characters
helper_var = char_counter; // Set helper variable as counter to start of gcode block
do {
line[char_counter-helper_var] = line[char_counter];
} while (line[char_counter++] != 0);
// Execute gcode block to ensure block is valid.
helper_var = gc_execute_line(line); // Set helper_var to returned status code.
if (helper_var) { return(helper_var); }
else {
helper_var = trunc(parameter); // Set helper_var to int value of parameter
settings_store_startup_line(helper_var,line);
}
} else { // Store global setting.
if(!read_float(line, &char_counter, &value))
{ return(STATUS_BAD_NUMBER_FORMAT); }
if(line[char_counter] != 0)
{ return(STATUS_UNSUPPORTED_STATEMENT); }
return(settings_store_global_setting(parameter, value));
}
上面的代碼解釋了下面的命令
https://github.com/grbl/grbl/wiki/Configuring-Grbl-v0.8
Grbl Internal Commands:
Technically, the remaining Grbl commands are not configuration commands, but we're going to explain them here for no good reason, other than for completeness.
The three current state commands: $G, $#, ?
Grbl provides three commands to report its current state and where it is. Of the three, one of them is real-time, responding with current position. The other two are not, but respond with how incoming blocks are going to be processed depending on the states set by g-code, settings, or switches. The reason they are not realtime is that Grbl has an internal buffer that stores and plans the buffered motions. The incoming gcode blocks just tack on a new motion at the end of the buffer when it has room. The buffer basically ensures Grbl motion move at the fastest and safest rates possible, constantly re-calculating it real-time as motions finish and new ones come in.
$G - View gcode parser state
This command prints all of the active gcode modes that the parser will interpret any incoming command. These modes include G20/G21 inches/mm mode, G54-G59 active work coordinate system, G0/G1/G2/G3 active motion mode, G17/G18/G19 active plane selection, G90/G91 absolute mode, G93/G94 inverse feed rate mode, M0/M1/M2 program flow, M3/M4/M5 spindle state, M8/M9 coolant state, T tool number, and F active feed rate. It will also list any active $Sx Grbl switches, like $S1 block delete. When called, Grbl will return a line like this:
[G0 G54 G17 G21 G90 G94 M0 M5 M9 T0 F500.000]
$# - View gcode parameters
G-code parameters generally store the G54-G59 work coordinate offsets and G28/G30 home positions (must not be confused with homing and machine zero. These home positions can be set anywhere in the machine space by the G28.1/G30.1 commands). Most of these parameters are directly written to EEPROM anytime they are changed and are persistent. Meaning that they will remain the same, regardless of power-down, until they are explicitly changed.
G54-G59 work coordinates can be changed via the G10 L2 Px or G10 L20 Px command defined by the NIST gcode standard and the EMC2 (linuxcnc.org) standard. G28/G30 home positions can be changed via the G28.1 and the G30.1 commands, respectively. Please note that G92 is not persistent or held in EEPROM per g-code standards, and will reset to zero when Grbl is reset. Please read these g-code standard to understand how they are used.
When $# is called, Grbl will respond with the stored offsets from machine coordinates for each system as follows.
[G54:4.000,0.000,0.000]
[G55:4.000,6.000,7.000]
[G56:0.000,0.000,0.000]
[G57:0.000,0.000,0.000]
[G58:0.000,0.000,0.000]
[G59:0.000,0.000,0.000]
[G28:1.000,2.000,0.000]
[G30:4.000,6.000,0.000]
[G92:0.000,0.000,0.000]
For the most part, these offset are not particularly useful unless you have homing enabled. If you do have homing enabled, these are wonderfully awesome, because once you home, you can always move back to same stored position by using the work coordinate systems within the accuracy of your machine. Or if you are making multiple parts and have a tool path for just one part, all you have to do is setup your work coordinate systems to the location where the next part is going to be made and re-run that same code.
? - Current status
The ? command immediately returns Grbl's active state and the real-time current position, both in machine coordinates and work coordinates. This may be sent at any time and works asynchronously with all other processes that Grbl is doing. The $13 Grbl setting determines whether it reports millimeters or inches. When ? is pressed, Grbl will immediately reply with something like the following:
The active states Grbl can be in are: Idle, Queue, Run, Hold, Home, Alarm, Check
Idle: All systems are go and it's ready for anything.
Queue: Motion(s) are queued in the planner buffer waiting for a cycle start command to be issued. Certain processes like check g-code mode can't run while something is queued. Reset to clear the queue.
Run: Indicates a cycle is running.
Hold: A feed hold is in process of executing, or slowing down to a stop. After the hold is complete, Grbl will enter a Queue state, waiting for a cycle start to resume the program.
Home: In the middle of a homing cycle. NOTE: Positions are not updated live during the homing cycle, but they'll be set to [0,0,0] once done.
Alarm: This indicates something has gone wrong or Grbl doesn't know its position. This state locks out all g-code commands, but allows you to interact with Grbl's settings if you need to. '$X' kill alarm lock releases this state and puts Grbl in the Idle state, which will let you move things again. As said before, be cautious of what you are doing after an alarm.
Check: Grbl is in check g-code mode. It will process and respond to all g-code commands, but not motion or turn on anything. Once toggled off with another '$C' command, Grbl will reset itself.
Other Commands $C $X $H ~ ! Ctrl-X
$C - Check gcode mode
This toggles the Grbl's gcode parser to take all incoming blocks process them completely, as it would in normal operation, but it does not move any of the axes, ignores dwells, and powers off the spindle and coolant. This is intended as a way to provide the user a way to check how their new g-code program fares with Grbl's parser and monitor for any errors. (And eventually this will also check for soft limit violations.)
When toggled off, Grbl will perform an automatic soft-reset (^X). This is for two purposes. It simplifies the code management a bit. But, it also prevents users from starting a job when their g-code modes are not what they think they are. A system reset always gives the user a fresh, consistent start.
NOTE: Eventually, the check gcode mode could be re-factored to allow for a "program resume" feature in Grbl. This means that Grbl could start a g-code program anywhere. It would internally go through all of the g-code program up to the desired mid-program resume point to set all of the parser states and locations, move to that start point, and begin executing/moving from that point on. For example, say you had to E-stop in the middle of a program because you forgot something or you have the wrong tool in the spindle. Your part is fine and need to restart the program. Right now, you'll have to start the program from the beginning and let it physically move and run up to the point where you e-stopped. If you have a long program, this could take a while. Instead, a "program resume" will just go through the beginning of the program internally, without moving anything, and only begin moving from the resume point on.
$X - Kill alarm lock
Grbl's alarm mode is a state when something has gone critically wrong, like a hard limit or an abort during a cycle, or if Grbl doesn't know its position. By default, if you have homing enabled and power-up the Arduino, Grbl enters the alarm state, because it does not know its position. The alarm mode will lock all g-code blocks until the '$H' homing cycle has been performed. Or if a user needs to override the alarm lock to move their axes off their limit switches, for example, '$X' kill alarm lock will override the locks and allow g-code functions to work again.
But, tread carefully!! This should only be used in emergency situations. The position has likely been lost, and Grbl may not be where you think it is. So, it's advised to use G91 incremental mode to make short moves. Then, perform a homing cycle or reset immediately afterwards.
$H - Run homing cycle
This command is the only way to perform the homing cycle in Grbl. Previously, G28 and G30 would automatically start the homing cycle, but this is incorrect according to the g-code standards. Homing is a completely separate command handled by the controller. G28 and G30 only move to a 'home'/pre-defined position that is stored in the g-code parameters, which can be located anywhere in the machine.
TIP: After running a homing cycle, rather jogging manually all the time to a position in the middle of your workspace volume. You can set a G28 or G30 pre-defined position to be your post-homing position, closer to where you'll be machining. To set these, you'll first need to jog your machine to where you would want it to move to after homing. Type G28.1 (or G30.1) to have Grbl store that position. So then after '$H' homing, you could just enter 'G28' (or 'G30') and it'll move there auto-magically. In general, I would just move the XY axis to the center and leave the Z-axis up. This ensures that there isn't a chance the tool in the spindle doesn't catch on anything.
~ - Cycle start
This is the cycle start or resume command that can be issued at any time, as it is a real-time command. When Grbl has motions queued in its buffer and is ready to go, the ~ cycle start command will start executing the buffer and Grbl will begin moving the axes. However, by default, auto-cycle start is enabled, so new users will not need this command unless a feed hold is performed. When a feed hold is executed, cycle start will resume the program. Cycle start will only be effective when there are motions in the buffer ready to go and will not work with any other process like homing.
! - Feed hold
The feed hold command will bring the active cycle to a stop via a controlled deceleration, so not to lose position. It is also real-time and may be activated at any time. Once finished or paused, Grbl will wait until a cycle start command is issued to resume to program. Feed hold can only pause a cycle and will not affect homing or any other process.
If you need to stop a cycle mid-program and can't afford losing position, perform a feed hold to have Grbl bring everything to a controlled stop. Once finished, you can then issue a reset. Always try to execute a feed hold whenever the machine is running before hitting reset, except of course if there is some emergency situation.
Ctrl-x - Reset Grbl
This is Grbl's soft reset command. It's real-time and can be sent at any time. As the name implies, it resets Grbl, but in a controlled way, retains your machine position, and all done without powering down your Arduino. The only times a soft-reset could lose position is when problems like if the steppers were killed while they were moving. If so, it will report if Grbl's tracking of the machine position has been lost. This is because an uncontrolled deceleration can lead to lost steps, and Grbl has no feedback to how much it lost (this is the problem with steppers in general). Otherwise, Grbl will just re-initialize, run the startup lines, and continue on its merry way.
Please note that it's recommended to do a soft-reset before starting a job. This guarantees that there aren't any g-code modes active that should be from playing around or setting up your machine. So, your machine will always starts fresh and consistently, and your machine does what you expect it to.
----------------------------------------
*******************
protocol.c 下2
*******************
內容9
Process and report status one line of incoming serial data.
void protocol_process()
{
uint8_t c;
while((c = serial_read()) != SERIAL_NO_DATA) {
if ((c == '') || (c == '')) {
內容9A();
}
else{
內容9B();
}
}
}
Performs an initial filtering by removing spaces and comments and capitalizing all letters.
Runtime command check point before executing line. Prevent any furthur line executions.
NOTE: If there is no line, this function should quickly return to the main program when the buffer empties of non-executable data.
內容9A();
protocol_execute_runtime();
if (sys.abort) { return; } // Bail to main program upon system abort
if (char_counter > 0) {// Line is complete. Then execute!
line[char_counter] = 0; // Terminate string
report_status_message(protocol_execute_line(line));
}
else {
// Empty or comment line. Skip block.
report_status_message(STATUS_OK); // Send status message for syncing purposes.
}
protocol_reset_line_buffer();
內容9B();
if (iscomment) {
// Throw away all comment characters
if (c == ')') {
// End of comment. Resume line.
iscomment = false;
}
} else {
if (c <= ' ') {
// Throw away whitepace and control characters
} else if (c == '/') {
// Block delete not supported. Ignore character.
} else if (c == '(') {
// Enable comments flag and ignore all characters until ')' or EOL.
iscomment = true;
}
else if (char_counter >= LINE_BUFFER_SIZE-1) {
// Report line buffer overflow and reset
report_status_message(STATUS_OVERFLOW);
protocol_reset_line_buffer();
} else if (c >= 'a' && c <= 'z') { // Upcase lowercase
line[char_counter++] = c-'a'+'A';
} else {
line[char_counter++] = c;
}
}
********************************
protocol 的代碼看完,還是糊里糊涂的。先繼續。
--------------------------------------------------------------------------
**********************
nuts_bolts.h
Header file for shared definitions, variables, and functions
***********************************
nuts_bolts.h 被 protocol.c 文件 引用過,并且 定義了很多 重要 變量和結構。
****************
內容1
引用頭文件
#include
#include
#include
#include "config.h"
#include "defaults.h"
#include "pin_map.h"
是 標準 頭文件,
網上搜一下,


config.h 已經理解過,compile time configuration
defaults.h 也理解過,defaults settings configuration file
pin_map.h - Pin mapping configuration file,端口功能定義,需要另外一篇文章理解。
********************************
內容2
利用宏定義常量
#define false 0
#define true 1
#define N_AXIS 3 // Number of axes
#define X_AXIS 0 // Axis indexing value
#define Y_AXIS 1
#define Z_AXIS 2
#define MM_PER_INCH (25.40)
#define INCH_PER_MM (0.0393701)
什么時候用 #define 什么時候用 const 定義常量,一般如下
1,對于數值和字符常量,用#define,注意添加必要注釋;
2,對于其它類型常量,用 const 限定符
區別,
define宏僅僅是展開(替換),有多少地方使用,就展開多少次,不會分配內存。(宏定義不分配內存,變量定義分配內存。) const常量會在內存中分配(可以是堆中也可以是棧中)。
宏定義很簡單。
************************
內容3
Useful macros
#define clear_vector(a) memset(a, 0, sizeof(a))
#define clear_vector_float(a) memset(a, 0.0, sizeof(float)*N_AXIS)
#define max(a,b) (((a) > (b)) ? (a) : (b))
#define min(a,b) (((a) < (b)) ? (a) : (b))
memset(a, 0, sizeof(a)),用 零 清空 整型數組 a;(memset 被 string.h 聲明)
memset(a, 0.0, sizeof(float)*N_AXIS),用 0.0 清空 浮點型 數組 a;
max() ,min() 很簡單
***********************
內容4
Bit field and masking macros
#define bit(n) (1 << n)
#define bit_true(x,mask) (x |= mask)
#define bit_false(x,mask) (x &= ~mask)
#define bit_toggle(x,mask) (x ^= mask)
#define bit_istrue(x,mask) ((x & mask) != 0)
#define bit_isfalse(x,mask) ((x & mask) == 0)
<<:左移位 http://baike.baidu.com/link?url= ... 2S3cSwNbpmTSUmOh-jK
n = 3; //n二進制為11
例如,
[code] n = 3; //n二進制為11
b = n<<1; //n向左移動一位,b二進制為110
b = n<<2; //n向左移動二位,b二進制為1100
b = 1<<n; 1像左移動n位,相當于2的n次方,b二進制為1000[="" code]
這些位運算符號
& 按位與
~ 按位取反
¦ 按位或
< < 按位左移
∧ 按位異或
http://blog.csdn.net/superdullwolf/article/details/4649080
位運算應用口訣
清零取反要用與,某位置一可用或
若要取反和交換,輕輕松松用異或
(1) 按位與-- &
1 清零特定位 (mask中特定位置0,其它位為1,s=s&mask)
2 取某數中指定位 (mask中特定位置1,其它位為0,s=s&mask)
(2) 按位或-- |
常用來將源操作數某些位置1,其它位不變。 (mask中特定位置1,其它位為0 s=s|mask)
(3) 位異或-- ^
1 使特定位的值取反 (mask中特定位置1,其它位為0 s=s^mask)
這些宏定義 是雙刃劍,除非 宏的名字特別清晰已記,或者很熟悉這些宏定義,否則也容易混淆。尤其對新手。
********************************
內容5
Define system executor bit map.
在 protocol.c 中簡單理解過,
#define EXEC_STATUS_REPORT bit(0) // bitmask 00000001
#define EXEC_CYCLE_START bit(1) // bitmask 00000010
#define EXEC_CYCLE_STOP bit(2) // bitmask 00000100
#define EXEC_FEED_HOLD bit(3) // bitmask 00001000
#define EXEC_RESET bit(4) // bitmask 00010000
#define EXEC_ALARM bit(5) // bitmask 00100000
#define EXEC_CRIT_EVENT bit(6) // bitmask 01000000
// #define bit(7) // bitmask 10000000
Used internally by runtime protocol as runtime command flags, which notifies the main program to execute the specified runtime command asynchronously.
NOTE: The system executor uses an unsigned 8-bit volatile variable (8 flag limit.)
The default flags are always false, so the runtime protocol only needs to check for a non-zero value to know when there is a runtime command to execute.
上面的宏 已經在 protocol.c 被應用了,而且一般 和 system_t 結構搭配,system_t 結構如下
***********************************
內容6
Define global system variables
typedef struct {
uint8_t abort; // System abort flag. Forces exit back to main loop for reset.
uint8_t state; // Tracks the current state of Grbl.
volatile uint8_t execute; // Global system runtime executor bitflag variable. See EXEC bitmasks.
int32_t position[N_AXIS]; // Real-time machine (aka home) position vector in steps.
// NOTE: This may need to be a volatile variable, if problems arise.
uint8_t auto_start; // Planner auto-start flag. Toggled off during feed hold. Defaulted by settings.
} system_t;
extern system_t sys;
用來記錄 系統 狀態
*********************************
內容7
Define system state bit map.
#define STATE_IDLE 0 // Must be zero.
#define STATE_INIT 1 // Initial power up state.
#define STATE_QUEUED 2 // Indicates buffered blocks, awaiting cycle start.
#define STATE_CYCLE 3 // Cycle is running
#define STATE_HOLD 4 // Executing feed hold
#define STATE_HOMING 5 // Performing homing cycle
#define STATE_ALARM 6 // In alarm state. Locks out all g-code processes. Allows settings access.
#define STATE_CHECK_MODE 7 // G-code check mode. Locks out planner and motion only.
// #define STATE_JOG 8 // Jogging mode is unique like homing.
The state variable primarily tracks the individual functions of Grbl to manage each without overlapping.
It is also used as a messaging flag for critical events.
******************************
內容8
聲明 函數
int read_float(char *line, uint8_t *char_counter, float *float_ptr);
void delay_ms(uint16_t ms);
void delay_us(uint32_t us);
void sys_sync_current_position();
******************************
GRBL 的內容量 很多,只是瀏覽 一下 就很費力氣,更別說理解要費多少精力。
-----------------------------------------------------------------
**********************
nuts_bolts.c
暫時只了解功能即可
***********************
不得不說,如果第一遍就把所有代碼理解,對我來說是不可能完成的任務。必須要有取舍,這個文件就可以暫時不求理解其如何實現,只了解功能即可。
nuts_bolts.c - Shared functions
*********************
內容1
引用頭文件
#include
#include "nuts_bolts.h"
#include "gcode.h"
#include "planner.h"
gcode.h - rs274/ngc parser. 一個重量級頭文件
planner.h - buffers movement commands and manages the acceleration profile plan
*************************
內容2
#define MAX_INT_DIGITS 8 // Maximum number of digits in int32 (and float)
extern float __floatunsisf (unsigned long);
************************
內容3
Extracts a floating point value from a string.
The following code is based loosely on the avr-libc strtod() function by Michael Stumpf and Dmitry Xmelkov and many freely available conversion method examples, but has been highly optimized for Grbl.
For known CNC applications, the typical decimal value is expected to be in the range of E0 to E-4.
Scientific notation is officially not supported by g-code, and the 'E' character may be a g-code word on some CNC systems.
So, 'E' notation will not be recognized.
NOTE: Thanks to Radu-Eosif Mihailescu for identifying the issues with using strtod().
int read_float(char *line, uint8_t *char_counter, float *float_ptr)
{
char *ptr = line + *char_counter;
unsigned char c;
// Grab first character and increment pointer. No spaces assumed in line.
c = *ptr++;
// Capture initial positive/minus character
bool isnegative = false;
if (c == '-') {
isnegative = true;
c = *ptr++;
} else if (c == '+') {
c = *ptr++;
}
// Extract number into fast integer. Track decimal in terms of exponent value.
uint32_t intval = 0;
int8_t exp = 0;
uint8_t ndigit = 0;
bool isdecimal = false;
while(1) {
c -= '0';
if (c <= 9) {
ndigit++;
if (ndigit <= MAX_INT_DIGITS) {
if (isdecimal) { exp--; }
intval = (((intval << 2) + intval) << 1) + c; // intval*10 + c
} else {
if (!(isdecimal)) { exp++; } // Drop overflow digits
}
} else if (c == (('.'-'0') & 0xff) && !(isdecimal)) {
isdecimal = true;
} else {
break;
}
c = *ptr++;
}
// Return if no digits have been read.
if (!ndigit) { return(false); };
// Convert integer into floating point.
float fval;
fval = __floatunsisf(intval);
// Apply decimal. Should perform no more than two floating point multiplications for the
// expected range of E0 to E-4.
if (fval != 0) {
while (exp <= -2) {
fval *= 0.01;
exp += 2;
}
if (exp < 0) {
fval *= 0.1;
} else if (exp > 0) {
do {
fval *= 10.0;
} while (--exp > 0);
}
}
// Assign floating point value with correct sign.
if (isnegative) {
*float_ptr = -fval;
} else {
*float_ptr = fval;
}
*char_counter = ptr - line - 1; // Set char_counter to next statement
return(true);
}
有點復雜。
***************************************
內容4
Delays variable defined milliseconds.
Compiler compatibility fix for _delay_ms(), which only accepts constants in future compiler releases.
void delay_ms(uint16_t ms)
{
while ( ms-- ) { _delay_ms(1); }
}
**********************************
內容5
Delays variable defined microseconds.
Compiler compatibility fix for _delay_us(), which only accepts constants in future compiler releases.
Written to perform more efficiently with larger delays, as the counter adds parasitic time in each iteration.
void delay_us(uint32_t us)
{
while (us) {
if (us < 10) {
_delay_us(1);
us--;
} else if (us < 100) {
_delay_us(10);
us -= 10;
} else if (us < 1000) {
_delay_us(100);
us -= 100;
} else {
_delay_ms(1);
us -= 1000;
}
}
}
*************************************
內容6
Syncs all internal position vectors to the current system position.
void sys_sync_current_position()
{
plan_set_current_position(sys.position[X_AXIS],sys.position[Y_AXIS],sys.position[Z_AXIS]);
gc_set_current_position(sys.position[X_AXIS],sys.position[Y_AXIS],sys.position[Z_AXIS]);
}
*************************************
大概可以看出,這個文件是起輔助作用的,不直接操作CNC 相關設置。
</pin_reset)|(1<<pin_feed_hold)|(1<<pin_cycle_start))
</pin_reset)|(1<<pin_feed_hold)|(1<<pin_cycle_start))
</x_direction_bit)|(1<<y_direction_bit)
</x_axis)|(1<<y_axis)|(1<</x_axis)|(1<</rxcie0;
</txen0;
</rxen0;
|